 This article shows how to update an Eclipse RCP Application widget from a worker thread and builds off of a clean RCP Application with a View. When programming GUI applications, it's often necessary to run a background processes to do some calculations or coordinate timed events. If these processes run on the main (GUI) thread, the GUI will be unresponsive to users' clicks during the process, leading to a bad user experience. To get around this problem, worker threads can be created to do the processing, leaving the GUI thread responsive to user input. The catch though is that you can't update any GUI components (SWT or JFace widgets in this case) from the worker thread. If you try to you get an exception such as: Exception in thread "Thread-3" org.eclipse.swt.SWTException: Invalid thread access. And worse, the compiler won't warn you of this pitfall. In this tutorial an Eclipse RCP application with a view is created, and a label is updated every second from a worker thread.
Step 0: Create a Hello World with Eclipse RCP and add a view to it
Step 1: Create a worker thread class. The following class called WorkerThread implements Runnable and is passed a reference to the MainView class. In its run method, which must be implemented, a counter is initialized to zero and is incremented by one followed by a one second pause. Right before the incrementation the updateLabelText method in the MainView is called. A go() method is added to the class to create the thread and call the run method.
package com.eclipsercptutorials.workerthread;

class WorkerThread implements Runnable{

// The timer interval in milliseconds
private static final int   TIMER_INTERVAL = 1000;

private MainView mainView;

public WorkerThread(MainView mainView){
this.mainView = mainView;
}

public void go(){

Thread t = new Thread(this);
t.start();

}

public void run() {
int counter = 0;
try {
while(mainView != null){
mainView.updateLabelText("Counter = " + counter);
counter++;
Thread.sleep(TIMER_INTERVAL);
}
} catch (InterruptedException e) {
e.printStackTrace();
}
}
}
Step 2: Add a label to the MainView and start the worker thread in the createPartControl method.
public void createPartControl(Composite parent) {

label = new Label(parent, SWT.None); //new up a Label widget
WorkerThread workerThread = new WorkerThread(this);
workerThread.go();
}
Step 3: Add a method in the MainView class that updates the label's text and is called by the worker thread. The method called updateLabelText in MainView uses the Display's asyncExec method to post a Runnable that is executed in the main thread enabling the update of the Label widget from the worker thread. In the Runnable's run method make sure the widget isn't null or disposed first.
package com.eclipsercptutorials.workerthread;

import org.eclipse.swt.SWT;
import org.eclipse.swt.SWTException;
import org.eclipse.swt.widgets.Composite;
import org.eclipse.swt.widgets.Display;
import org.eclipse.swt.widgets.Label;
import org.eclipse.ui.part.ViewPart;

public class MainView extends ViewPart {

public static final String ID = "com.eclipsercptutorials.workerThread.mainView"; // the ID needs to match the id set in the view's properties

public Label label;

public MainView() {}

public void createPartControl(Composite parent) {

label = new Label(parent, SWT.None); //new up a Label widget
WorkerThread workerThread = new WorkerThread(this);
workerThread.go();
}

public void setFocus() {}

public void updateLabelText(final String labelText){

try{
Display.getDefault().asyncExec(new Runnable(){
public void run(){
if(!label.isDisposed() && label !=null){
label.setText(labelText);
}
}
});
}catch(SWTException e){
//eat it!
}
}
}
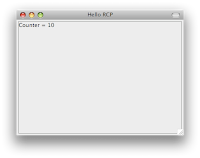
Step 3: Run the application and test if everything worked. Your application should now have a label in the view that updates its value each second and look something like this:

Piece of cake!!
<--- Previous - Import and Export an Eclipse RCP Application Project
---> Next - Animation in Eclipse RCP Applications - A Bouncing Ball
Also see: Eclipse RCP Tutorial Table of Contents
If I had found your Blog earlier I would not had to search days for a solution.
ReplyDeleteGood explanation!
I say the same thing : thanks for the explanation ! ! !
ReplyDeleteHi,
ReplyDeleteYou saved my time a lot.
Thank you very much.
Srinivas.
Thank you very much for this blog.
ReplyDeleteYou saved my time a lot.
Thank you very much for this blog.
ReplyDelete