Eclipse
Step 1: Download Eclipse. Download the lastest version of Eclipse at the Main Eclipse download page. You can download which ever flavor of Eclipse you like the best. I chose Eclipse IDE for J2EE Developers.Step 2: Install Eclipse. Unpack the Eclipse .zip file and move the entire folder 'eclipse' to the 'Programs' folder on the hard drive.
M2Eclipse
Step 3. In Eclipse, go to Help --> 'Eclipse Marketplace...' and search for 'Maven'. Click on 'Install' for the m2eclipse plugin title 'Maven Integration for Eclipse'.Step 4: Click through the wizard, installing m2eclipse.
Maven (Optional)
Installing Maven is optional because M2Eclipse does have its own embedded version of Maven. I chose to install Maven separately for two reasons. First, I wanted the latest and greatest version of Maven. Secondly, I plan to run a CI server (Jenkins) that needs access to Maven, and I wanted M2Eclipse and Jenkins to both use the same Maven install. If you don't plan on installing Maven separetely, skip to step 10.Step 5: Download Maven. Download the lastest version of Maven at the Main Apache Maven download page choosing the binary .zip file for Windows.
Step 6: Install Maven. Unpack the Maven .zip file and move the entire folder 'apache-maven.x.x.x' to the 'Programs' folder on the hard drive.
Step 7: Set environment variables (adjust according to your setup):
JAVA_HOME C:\Program Files\Java\jdk1.6.0_25
M2_HOME C:\Program Files\apache-maven-3.0.4
M2 %M2_HOME%\bin
Path ;%M2%;%JAVA_HOME%\bin
Step 8: Verify Maven install with 'mvn -- version' at the command line. Note, if you had the command line open before changing the environment variables, close it and reopen it.
>mvn --version
Apache Maven 3.0.4 (r1232337; 2012-01-17 09:44:56+0100)
Maven home: C:\Program Files\apache-maven-3.0.4
Java version: 1.6.0_25, vendor: Sun Microsystems Inc.
Java home: C:\Program Files\Java\jdk1.6.0_25\jre
Default locale: de_DE, platform encoding: Cp1252
OS name: "windows 7", version: "6.1", arch: "x86", family: "windows"
Step 9: Configure m2eclipse. In Eclipse, go to Window --> Preferences
9.a. Under Maven --> Installations, specify an external Maven install by clicking 'Add...' next to 'Select the installation used to launch Maven'. By default m2eclipse selects it's own embedded Maven version.
9.b. Under Maven --> User Settings, specify a settings.xml by clicking 'Browse...'. I chose to put the settings.xml file inside Mave's conf folder.
9.c. Edit the settings.xml file and specify the location of the local Maven repository. I chose 'C:\Program Files\apache-maven-3.0.4\repository'. After editing settings.xml click the 'Update Settings' in 'User Settings' from the previous step.
A repository in Maven is used to hold build artifacts and dependencies of varying types. The local repository refers to a copy on your own installation that is a cache of the remote downloads, and also contains the temporary build artifacts that you have not yet released.
Hello World
Step 10: Create Maven Project in Eclipse.10.a. In Eclipse open the New Project Wizard by clicking File --> New --> Project. Under 'Maven' select 'Maven Project' and click 'Next'.
10.b. On the next page of the wizard, check 'Create a simple project' and click 'Next'.
10.c. Give a 'Group Id' and an 'Artifact Id' and click 'Finish'.
Step 11: Create a class with a main method in src/main/java. In this case I created MelloMavenMain.java.
Step 12: In the main method, log a message using slf4j. I chose to use a 3rd party library to do this to demonstrated how to depend on 3rd party libraries in the next step.
Logger logger = LoggerFactory.getLogger(HelloMavenMain.class);
logger.info("Hello Maven!");
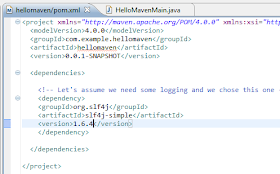
Step 13: Add the slf4j dependency in the project's pom.xml file.
Step 14: Package your program. Right-click on the project and choose Run As... --> 'Maven Install'. This will create a jar file for your project in the 'target' directory.org.slf4j slf4j-simple 1.6.4
Piece of Cake!!!
Helpful Links
Maven Documentationm2eclipse
Maven Eclipse Plugin


Nice! Nice!! Nice!! Keep Posting!!
ReplyDeleteI have to say this is how these things should be written. Great job
ReplyDeleteHey,
ReplyDeleteThanks for the post!
FYI:
I had to fix case of
groupid --> groupId
artifactid --> artifactId.
Best,
Shakhal
Hey!
ReplyDeleteThanks for the post!
FYI
I had to fix case of
groupid --> groupId
artifactid --> artifactId
in step 13, dependency code.
Best,
Shakhal
Great! Thank you!
ReplyDeleteReally useful and well explained thanks!
ReplyDeleteGreat tutorial, thanks!
ReplyDeletenicely explained..saved me quite some time :)
ReplyDelete