Thursday, December 13, 2012
Wednesday, November 14, 2012
Monday, October 29, 2012
Unit Testing Runtime Exceptions with JUnit4 and Hamcrest
Junit and Hamcrest make unit testing with Java almost enjoyable. In this post, I show how to unit test Exceptions with JUnit4 and Hamcrest. In this over-simplified example, I'm testing a method that always throws an IllegalArgumentException. In real-life the IllegalArgumentException would only be thrown under special circumstances given certain arguments, and those are the ones you want to test with the unit test.
The basic idea is to surround the method you want to test with a try catch block and pass it an argument that will trigger the IllegalArgumentException to be thrown. The fail method call should never be reached, and if it does the unit test should fail. What should happen is that the IllegalArgumentException is caught, followed by a check for the correct message.
Piece of Cake!!!
The basic idea is to surround the method you want to test with a try catch block and pass it an argument that will trigger the IllegalArgumentException to be thrown. The fail method call should never be reached, and if it does the unit test should fail. What should happen is that the IllegalArgumentException is caught, followed by a check for the correct message.
import static org.hamcrest.CoreMatchers.equalTo;
import static org.hamcrest.CoreMatchers.is;
import static org.hamcrest.MatcherAssert.assertThat;
import static org.junit.Assert.fail;

import org.junit.Test;

/**
 * The following example code demonstrates how to unit test Exceptions with JUnit and Hamcrest
 */
public class ExceptionUnitTesting {

  @Test
  public void test() {

    try {
      blah("asdf");
      fail("Expected exception");
    } catch (IllegalArgumentException e) {
      assertThat(e.getMessage(), is(equalTo("Argument foo is not valid!")));
    }
  }

  /**
   * @param foo
   * @throws IllegalArgumentException - in this test case always
   */
  private void blah(String foo) {

    throw new IllegalArgumentException("Argument foo is not valid!");
  }
}
Piece of Cake!!!
Labels:
Java

Monday, October 1, 2012
Import a Maven Git Project Into Eclipse
The Easy Way
Prerequisites
Install M2Eclipse
Step 1: Clone or create Git Repo. First, you need to clone a Git repo into an empty folder in your workspace. You need to use a Git client such as SourceTree or TortoiseGit for this. Create you workspace first if it isn't already, and clone the git repo directly into a new folder labeled with the project name.
Step 2: Import Into Eclipse. In the Package Explorer view, right-click and choose Import... In the wizard choose Maven -> "Existing Maven Projects" as the project type. Search for the project home directory and click though the wizard.
The Hard Way
Prerequisites
Install M2Eclipse
Install egit
Step 1: Right-click in the Package Explorer area and select Import..., select Maven -> Check out Maven Projects from SCM, and click Next.

Step 2: Choose "git" as the SCM connector next to "SCM URL:" and type in the Git repo URL. If there are no connectors to choose from you have to first install that Eclipse plugin. To do that, click on the "m2e Marketplace" link in the lower right hand corner of the dialog box.

Step 3: Check m2e-egit and click Finish.

Step 4: Select "git" as the SCM connector and type in the Git repo URL.

Step 5: After asking you for the passphrase for ssh access to the Git repo, it will download and import the Java project as a Maven project into your workspace.
Piece of Cake!!!
Sunday, September 23, 2012
Thursday, September 20, 2012
Wednesday, September 19, 2012
Tuesday, September 11, 2012
Avoiding Name Collisions When Organizing Imports in Eclipse
Is there any way to get Eclipse to automatically give preference to a preferred import when organizing imports? Thankfully, the answer is yes.
For example, I'd like to be able to write:
List myList = new ArrayList();
hit Ctrl + Shift + O and have Eclipse add:
import java.util.List;
And not always ask me which List I want to import:

To tell Eclipse not to ever consider java.awt.List, for example, go to Preferences --> Java --> Appearance --> Type Filters menu. Click add and enter Types you do not want Eclipse to consider for automatic insertion of import statements.

Piece of Cake!!!
For example, I'd like to be able to write:
List
hit Ctrl + Shift + O and have Eclipse add:
import java.util.List;
And not always ask me which List I want to import:

To tell Eclipse not to ever consider java.awt.List, for example, go to Preferences --> Java --> Appearance --> Type Filters menu. Click add and enter Types you do not want Eclipse to consider for automatic insertion of import statements.

Piece of Cake!!!
Tuesday, August 28, 2012
XChange - Open Source Java API for MtGox Bitcoin Exchange

UPDATE March 9, 2013: Version 1.5.0 released. Support for 10 exchanges.
UPDATE Jan 31, 2013: Version 1.4.0 released. Support for Canadian Virtual Exchange. Mostly bug fixes.
UPDATE Jan 16, 2013: Version 1.3.0 released. Support for many more exchanges. See release notes and also XChange Release 1.3.0 Announcement
UPDATE Oct 11, 2012: Version 1.2.0 released. Support for Canadian Virtual Exchange.
Supported Exchanges
Together with other members from the Bitcoin community, I've recently created a new open source Java library called XChange. XChange is a Java library providing a simple and consistent API for interacting with a diverse set of financial security exchanges including Bitcoin. The first exchange implemented is the world's largest Bitcoin exchange - Mt Gox. The plan is to add more Bitcoin exchanges and other traditional financial exchanges offerring trading APIs such as Interactive Brokers.
As of the most recent release 1.1.0, Xchange offers the following functionality:
- Support for MtGox Bitcoin Exchange (public) polling market data (ticker, depth, trades, etc.)
- Support for MtGox Bitcoin Exchange (private) polling trade data (account info, market order, limit order, cancel order open orders, etc.)
- Support for MtGox Bitcoin Exchange (public) streaming market (ticker)
- Support for MtGox Bitcoin Exchange (public) streaming market (depth, trades, etc.)
- Support for MtGox Bitcoin Exchange (private) streaming trade data (account info, market order, limit order, cancel order open orders, etc.)
Relevant Links
Project Home - http://xeiam.com/xchange.jspCode on Github - https://github.com/timmolter/XChange
Example Code - http://xeiam.com/xchange_examplecode.jsp
Examples
The following examples demonstrate getting Ticker data from MtGox, first using the polling API, and second using the streaming API.Ticker via Polling API
package com.xeiam.xchange.examples.mtgox.v1.polling;

import com.xeiam.xchange.Currencies;
import com.xeiam.xchange.Exchange;
import com.xeiam.xchange.ExchangeFactory;
import com.xeiam.xchange.dto.marketdata.Ticker;
import com.xeiam.xchange.service.marketdata.polling.PollingMarketDataService;

/**
 * Test requesting polling Ticker at MtGox
 */
public class TickerDemo {

  private static PollingMarketDataService marketDataService;

  public static void main(String[] args) {

    // Use the factory to get the version 1 MtGox exchange API using default settings
    Exchange mtGox = ExchangeFactory.INSTANCE.createExchange("com.xeiam.xchange.mtgox.v1.MtGoxExchange");

    // Interested in the public polling market data feed (no authentication)
    marketDataService = mtGox.getPollingMarketDataService();

    // Get the latest ticker data showing BTC to USD
    Ticker ticker = marketDataService.getTicker(Currencies.BTC, Currencies.USD);
    double value = ticker.getLast().getAmount().doubleValue();
    String currency = ticker.getLast().getCurrencyUnit().toString();
    System.out.println("Last: " + currency + "-" + value);

    System.out.println("Last: " + ticker.getLast().toString());
    System.out.println("Bid: " + ticker.getBid().toString());
    System.out.println("Ask: " + ticker.getAsk().toString());

    // Get the latest ticker data showing BTC to EUR
    ticker = marketDataService.getTicker(Currencies.BTC, Currencies.EUR);
    System.out.println("Last: " + ticker.getLast().toString());
    System.out.println("Bid: " + ticker.getBid().toString());
    System.out.println("Ask: " + ticker.getAsk().toString());

    // Get the latest ticker data showing BTC to GBP
    ticker = marketDataService.getTicker(Currencies.BTC, Currencies.GBP);
    System.out.println("Last: " + ticker.getLast().toString());
    System.out.println("Bid: " + ticker.getBid().toString());
    System.out.println("Ask: " + ticker.getAsk().toString());

  }

}
Result:Last: USD-5.14739 Last: USD 5.14739 Bid: USD 5.12011 Ask: USD 5.1299 Last: EUR 4.07 Bid: EUR 4.0527 Ask: EUR 4.07 Last: GBP 3.3452 Bid: GBP 3.3 Ask: GBP 3.34091
Ticker via Streaming API
package com.xeiam.xchange.examples.mtgox.v1.streaming;

import java.util.concurrent.BlockingQueue;

import com.xeiam.xchange.Currencies;
import com.xeiam.xchange.Exchange;
import com.xeiam.xchange.dto.marketdata.Ticker;
import com.xeiam.xchange.mtgox.v1.MtGoxExchange;
import com.xeiam.xchange.service.marketdata.streaming.StreamingMarketDataService;

/**
 * Test requesting streaming Ticker at MtGox
 */
public class TickerDemo {

  public static void main(String[] args) {

    TickerDemo tickerDemo = new TickerDemo();
    tickerDemo.start();
  }

  private void start() {

    // Use the default MtGox settings
    Exchange mtGox = MtGoxExchange.newInstance();

    // Interested in the public streaming market data feed (no authentication)
    StreamingMarketDataService streamingMarketDataService = mtGox.getStreamingMarketDataService();

    // Get blocking queue that receives streaming ticker data
    BlockingQueue tickerQueue = streamingMarketDataService.requestTicker(Currencies.BTC, Currencies.USD);

    // take streaming ticker data from the queue and do something with it
    while (true) {
      try {
        // Put your ticker event handling code here
        doSomething(tickerQueue.take());
      } catch (InterruptedException e) {
        e.printStackTrace();
      }
    }
  }

  /**
   * Do something fun with the streaming data!
   *
   * @param ticker
   */
  private void doSomething(Ticker ticker) {

    System.out.println(ticker.toString());
  }

}
Result:Ticker [timestamp=2012-08-26T20:09:13.202Z, last=USD 10.6, bid=USD 10.55248, ask=USD 10.6, tradableIdentifier=BTC, volume=3078691906206] Ticker [timestamp=2012-08-26T20:09:18.651Z, last=USD 10.6, bid=USD 10.55248, ask=USD 10.6, tradableIdentifier=BTC, volume=3068691906206] Ticker [timestamp=2012-08-26T20:09:19.568Z, last=USD 10.6, bid=USD 10.55248, ask=USD 10.6, tradableIdentifier=BTC, volume=3068691906206] Ticker [timestamp=2012-08-26T20:09:23.152Z, last=USD 10.6, bid=USD 10.55248, ask=USD 10.6, tradableIdentifier=BTC, volume=3068691906206] Ticker [timestamp=2012-08-26T20:09:23.975Z, last=USD 10.6, bid=USD 10.55248, ask=USD 10.6, tradableIdentifier=BTC, volume=3068691906206] Ticker [timestamp=2012-08-26T20:09:24.790Z, last=USD 10.6, bid=USD 10.55248, ask=USD 10.6, tradableIdentifier=BTC, volume=3068691906206] Ticker [timestamp=2012-08-26T20:09:25.205Z, last=USD 10.6, bid=USD 10.55248, ask=USD 10.6, tradableIdentifier=BTC, volume=3068691906206] Ticker [timestamp=2012-08-26T20:09:26.018Z, last=USD 10.6, bid=USD 10.55248, ask=USD 10.6, tradableIdentifier=BTC, volume=3068691906206] Ticker [timestamp=2012-08-26T20:09:26.543Z, last=USD 10.6, bid=USD 10.55248, ask=USD 10.6, tradableIdentifier=BTC, volume=3068691906206]Piece of Cake!!!
Monday, August 27, 2012
Running Average and Running Standard Deviation in Java
Today I needed to generate statistics for a simulation in real-time, which forced me to code a class that calculates the running average and running standard deviation of incoming data. I remember doing this a long time ago for another project based on MATLAB, but today I needed a Java implementation. The following code example shows how to calculate the running average and running standard deviation for streaming data. Thanks to Subluminal Messages for the simple math implementation!
Piece of Cake!!!
The Code
public class RunningStatDemo {

  public static void main(String[] args) {

    RunningStatDemo rsd = new RunningStatDemo();
    rsd.go();
  }

  private void go() {

    RunningStat rs = new RunningStat();
    rs.put(1);
    System.out.println("ave: " + rs.getAverage());
    System.out.println("std: " + rs.getStandardDeviation());

    rs.put(1);
    System.out.println("ave: " + rs.getAverage());
    System.out.println("std: " + rs.getStandardDeviation());

    rs.put(10);
    System.out.println("ave: " + rs.getAverage());
    System.out.println("std: " + rs.getStandardDeviation());

    rs.put(20);
    System.out.println("ave: " + rs.getAverage());
    System.out.println("std: " + rs.getStandardDeviation());

    rs.put(50);
    System.out.println("ave: " + rs.getAverage());
    System.out.println("std: " + rs.getStandardDeviation());

    rs.put(50);
    System.out.println("ave: " + rs.getAverage());
    System.out.println("std: " + rs.getStandardDeviation());
  }

  public class RunningStat {

    private int count = 0;
    private double average = 0.0;
    private double pwrSumAvg = 0.0;
    private double stdDev = 0.0;

    /**
     * Incoming new values used to calculate the running statistics
     *
     * @param value
     */
    public void put(double value) {

      count++;
      average += (value - average) / count;
      pwrSumAvg += (value * value - pwrSumAvg) / count;
      stdDev = Math.sqrt((pwrSumAvg * count - count * average * average) / (count - 1));

    }

    public double getAverage() {

      return average;
    }

    public double getStandardDeviation() {

      return Double.isNaN(stdDev) ? 0.0 : stdDev;
    }

  }

}
Results
ave: 1.0
std: 0.0
ave: 1.0
std: 0.0
ave: 4.0
std: 5.196152422706632
ave: 8.0
std: 9.055385138137417
ave: 16.4
std: 20.354360712142253
ave: 22.0
std: 22.794736234490628
Piece of Cake!!!
Labels:
Java
Sunday, August 26, 2012
Create Javadocs for a Multi-Module Maven Project
In this tutorial, I show how to create Javadocs for a multi-module Maven project. Creation of Javadocs requires the use of the Maven maven-javadoc-plugin plugin and running "mvn javadoc:aggregate" on the parent pom.xml. For the sake of this tutorial, I'm taking some excerpts from one of my current Open Source Projects - XChange.
Javadocs for XChange on xeiam.com - To see what the generated Javadocs look like.
Piece of Cake!!!
See also: Maven Project Compiles in Eclipse but Maven Build Fails
See also: Using Maven Offline
See also: Hello World - Maven, M2Eclipse and Eclipse
Relevant Links
XChange on Github - To see an actual working exampleJavadocs for XChange on xeiam.com - To see what the generated Javadocs look like.
How To
Step 1: Add the following to the parent pom.xml file:<build> <pluginmanagement> <plugin> <groupid>org.apache.maven.plugins</groupId> <artifactid>maven-javadoc-plugin</artifactId> <version>2.8.1</version> </plugin> </pluginManagement> <plugins> <plugin> <groupid>org.apache.maven.plugins</groupId> <artifactid>maven-javadoc-plugin</artifactId> </plugin> </plugins> </build>Step 2: Run the following mvn command:
mvn javadoc:aggregate
Piece of Cake!!!
See also: Maven Project Compiles in Eclipse but Maven Build Fails
See also: Using Maven Offline
See also: Hello World - Maven, M2Eclipse and Eclipse
Saturday, August 25, 2012
Java XChart Library Now Supports Error Bars

I just recently added support in XChart for making plots with error bars, which is what this post is about. The following demo, shows how to add error bars to an XChart chart. BTW, if you have any feature requests for XChart, please feel free to open a new issue on Github here. For more XChart exmaples go here.
XChart - Open Source Charting API
To use XChart, you first need to get the XChart jar, which is available here. If you use Maven, just add the following to your dependencies in pom.xml:<dependency> <groupId>com.xeiam</groupId> <artifactId>xchart</artifactId> <version>1.1.0</version> </dependency>
The XChart artifacts are currently hosted on the Xeiam Nexus repository here:
<repositories>
  <repository>
    <id>xchange-release</id>
    <releases/>
    <url>http://nexus.xeiam.com/content/repositories/releases</url>
  </repository>
  <repository>
    <id>xchange-snapshot</id>
    <snapshots/>
    <url>http://nexus.xeiam.com/content/repositories/snapshots/</url>
  </repository>
</repositories>
Error Bars Example Code
package com.xeiam.xchart.example;

import java.util.ArrayList;
import java.util.Collection;

import com.xeiam.xchart.Chart;
import com.xeiam.xchart.series.Series;
import com.xeiam.xchart.series.SeriesColor;
import com.xeiam.xchart.series.SeriesLineStyle;
import com.xeiam.xchart.series.SeriesMarker;
import com.xeiam.xchart.swing.SwingWrapper;

/**
 * Create a Chart with error bars
 *
 * @author timmolter
 */
public class Example8 {

  public static void main(String[] args) {

    // generates data
    int size = 10;
    Collection xData1 = new ArrayList();
    Collection yData1 = new ArrayList();
    Collection errorBars = new ArrayList();
    for (int i = 0; i <= size; i++) {
      xData1.add(i);
      yData1.add(10 * Math.exp(-i));
      errorBars.add(Math.random() + .3);
    }

    // Create Chart
    Chart chart = new Chart(600, 400);

    // Customize Chart
    chart.setChartTitleVisible(false);
    chart.setChartLegendVisible(false);
    chart.setAxisTitlesVisible(false);

    // Series 1
    Series series1 = chart.addSeries("10^(-x)", xData1, yData1, errorBars);
    series1.setLineColor(SeriesColor.PURPLE);
    series1.setLineStyle(SeriesLineStyle.DASH_DASH);
    series1.setMarkerColor(SeriesColor.GREEN);
    series1.setMarker(SeriesMarker.SQUARE);

    new SwingWrapper(chart).displayChart();
  }

}
Resulting Plot

Labels:
Java
Tuesday, August 21, 2012
Thursday, August 9, 2012
Wednesday, August 8, 2012
Monday, August 6, 2012
Sunday, June 10, 2012


Alpine Tubifex Worms
Yesterday, while my cousin and I were hiking in the German alps, we stumbled upon some very bizarre creatures in a small permanent puddle in a cow pasture at around 1500m above sea level. What we at first saw was what looked like a colony of tiny red things undulating together and anchored to the silty bottom of the puddle.

After poking the moving red mat, it quickly receded and disappeared under the surface leaving little holes.


Here's what the red things turned out to be - little red worms.

After taking pictures and doing some online research at home, we determined that they must have been Tubifex worms. Here are the links to the German and English Wikipedia pages.
Friday, June 1, 2012
Load a logback.xml Configuration File Programmatically
Today I had a unique situation where I needed to load a logback.xml file programmatically for Logback logging rather than via the standard "from the classpath" way, and here's how I did it. It was quite simple.
The following snippet shows how to load a logging configuration file such as logback.xml programmatically:
Piece of Cake!!
The following snippet shows how to load a logging configuration file such as logback.xml programmatically:
LoggerContext context = (LoggerContext) LoggerFactory.getILoggerFactory();
try {

  JoranConfigurator configurator = new JoranConfigurator();
  configurator.setContext(context);
  configurator.doConfigure(logFilePath); // loads logback file
} catch (JoranException je) {
  // StatusPrinter will handle this
} catch (Exception ex) {

  ex.printStackTrace(); // Just in case, so we see a stacktrace

}
StatusPrinter.printInCaseOfErrorsOrWarnings(context); // Internal status data is printed in case of warnings or errors.
Piece of Cake!!
Thursday, May 31, 2012
Delete a Branch on GitHub
Deleting a branch on Github or any remote Git repository is very simple and just requires running the following Git command:
git push REMOTENAME :BRANCHNAME
Piece of Cake!!!
git push REMOTENAME :BRANCHNAME
Piece of Cake!!!
Saturday, May 26, 2012
Maven Project Compiles in Eclipse but Maven Build Fails
Today I ran into a perplexing Eclipse/Maven issue where my Maven project would compile just fine according to Eclipse, but the Maven compile goal would fail. If you are reading this you probably had the same issue and this might help.
Eclipse Indigo
[ERROR] Failed to execute goal org.apache.maven.plugins:maven-compiler-plugin:2.3.2:compile (default-compile) on project blah: Compilation failure: Compilation failure:
[ERROR] Blah.java:[6,17] error: package javax.jnlp does not exist
I could have saved a lot more time debugging this, if Maven would have produced a more specific error message. Oh well.
Version Information
Maven 3.0.4Eclipse Indigo
The Error
The following error was produced by the Maven compile goal:[ERROR] Failed to execute goal org.apache.maven.plugins:maven-compiler-plugin:2.3.2:compile (default-compile) on project blah: Compilation failure: Compilation failure:
[ERROR] Blah.java:[6,17] error: package javax.jnlp does not exist
The Solution
The problem was caused by the scope I had defined for the jnlp-api dependency in a child module in a multi-module Maven project. In the parent module inside the distributionManagement tag in the pom.xml, I defined the scope as "provided". The problem occurred when I accidentally defined the scope for that dependency in the child's pom.xml as "runtime". The fix was of course to make the scopes match in both pom.xml files.I could have saved a lot more time debugging this, if Maven would have produced a more specific error message. Oh well.
Friday, May 25, 2012
Using Maven Offline
Here's another micro blog intended to help other programmers avoid a very frustrating day of trying to get Maven to work offline. I've only been using Maven for a few months, and today was the first day I worked from home, away from the office, on a new Maven project. I had my laptop with me and assumed I could just tell Maven to work offline out of my local repository. Sounds simple right? I have all the jars I need right here on my local machine. Well, what should have been straight forward was a nightmare, which in the end is very silly and Maven COULD have made this much easier to debug. Hopefully in the next release they will consider improving their error messages.
Failure to find blah in http://repo.maven.apache.org/maven2 was cached in the local repository, resolution will not be reattempted until the update interval of central has elapsed or updates are forced -> [Help 1]
Failed to execute goal on project blah : Could not resolve dependencies for project
The following artifacts could not be resolved
[WARNING] The POM for blah is missing, no dependency information available
The repository system is offline but the artifact blah is not available in the local repository.
One
Two
Three
To quote the first one:
Version Information
Maven 3.0.4The Problem
To run Maven offline, you need to use the -o argument or set offline to true in settings.xml. I assumed that would be all that's necessary, but I kept getting the following errors for third-party jars that I added to our Nexus repo at work:Failure to find blah in http://repo.maven.apache.org/maven2 was cached in the local repository, resolution will not be reattempted until the update interval of central has elapsed or updates are forced -> [Help 1]
Failed to execute goal on project blah : Could not resolve dependencies for project
The following artifacts could not be resolved
[WARNING] The POM for blah is missing, no dependency information available
The repository system is offline but the artifact blah is not available in the local repository.
The Reason
After an entire day of tracking down the problem online, I finally stumbled upon the reason for all the issues described in these three articles.One
Two
Three
To quote the first one:
"Thank you. That was the problem. I had had a setting.xml that pointed to
an internal repo at my company, and then cleared it out. Maven puts a
file named _maven.repositories in with the jar file in the local repo
that keeps track of where the jar came from. If the remote repo isn't
available, the build fails. Deleting _maven.repositories solved the
problem.
This seems like an extrordinarily bad design. If a remote system goes
down, you can't do a build? If you have an internal repo at work, and
you take your laptop home, you can't do a build?"
The Solution
Delete all _maven.repositories files in your local repository. Once I did that, the build worked like it should. There's arguably a good reason for Maven to use these files, but it's pretty weak that Maven couldn't improve the error message for this situation. Please go to the Jira Issue Page for this and upvote this.Monday, May 14, 2012
Install Sonatype Nexus as Windows Service
The following mini-guide takes you through the steps I used to install a Nexus server on a Windows machine.
Step 1: Download and unzip nexus.

Step 2: Move the folder "nexus-2.0.4-1-bundle" to C:\Program Files.
Step 3: Install the nexus Windows Service. Double click the batch file: C:\Program Files (x86)\nexus-2.0.4-1-bundle\nexus-2.0.4-1\bin\jsw\windows-x86-32\install-nexus.bat.
Step 4: Open up Windows Services and start "nexus".

Step 5: Verify it's working. Open up a browser and go to http://localhost:8081/nexus. Login using the nexus default username and password of admin/admin123.

Piece of Cake!!!
Thursday, May 3, 2012
Install Sonar Using Oracle as the Database
This short tutorial shows how to setup Sonar with an Oracle 10g database. These instructions and screenshots are
Step 1: Configure Sonar. Open up C:\Program Files\sonar-3.0\conf\sonar.properties
comment out:
sonar.jdbc.url: jdbc:derby://localhost:1527/sonar;create=true
remove comment:
sonar.jdbc.url: jdbc:oracle:thin:@localhost/XE
sonar.jdbc.driverClassName: oracle.jdbc.OracleDriver
sonar.jdbc.validationQuery: select 1 from dual
Step 2: Create database user. Open up SQL*Plus and run the following commands at the prompt:
Step 3: Get the oracle jdbc driver. Download ojdbc6.jar from Oracle's download site and place it in C:\Program Files\sonar-3.0\extensions\jdbc-driver\oracle.

Step 4: Restart Sonar.
Step 5: Verify it's running. Open up a browser and go to: http://localhost:9000/. You should see the following...

Viewing the Sonar System Info should reveal that Sonar is indeed running with Oracle:

Piece of Cake!!!
Step 1: Configure Sonar. Open up C:\Program Files\sonar-3.0\conf\sonar.properties
comment out:
sonar.jdbc.url: jdbc:derby://localhost:1527/sonar;create=true
remove comment:
sonar.jdbc.url: jdbc:oracle:thin:@localhost/XE
sonar.jdbc.driverClassName: oracle.jdbc.OracleDriver
sonar.jdbc.validationQuery: select 1 from dual
Step 2: Create database user. Open up SQL*Plus and run the following commands at the prompt:
connect username/password
CREATE USER sonar IDENTIFIED BY sonar;
GRANT UNLIMITED TABLESPACE, CONNECT, RESOURCE, CREATE SESSION, CREATE TABLE, CREATE VIEW, CREATE SYNONYM, CREATE SEQUENCE, CREATE PROCEDURE, CREATE TRIGGER TO sonar;
EXIT
Step 3: Get the oracle jdbc driver. Download ojdbc6.jar from Oracle's download site and place it in C:\Program Files\sonar-3.0\extensions\jdbc-driver\oracle.

Step 4: Restart Sonar.
Step 5: Verify it's running. Open up a browser and go to: http://localhost:9000/. You should see the following...

Viewing the Sonar System Info should reveal that Sonar is indeed running with Oracle:

Piece of Cake!!!
Relevant Links
SQL*Plus on WikipediaWednesday, May 2, 2012
Install Sonar on Windows as a Windows Service
This short tutorial shows how to setup Sonar as a Windows Service on Windows.
Step 1: Download Sonar from the Sonar download website.

Step 2: Unzip the .zip file and move the entire 'sonar-3.0' directory to 'C:\Program Files'.
Step 3: Double-click C:\Program Files\sonar-3.0\bin\windows-x86-64\StartSonar.bat to start Sonar. If your machine is 32-bit, run C:\Program Files\sonar-3.0\bin\windows-x86-32\StartSonar.bat instead.
Step 4: Verify it's running. Open up a browser and go to: http://localhost:9000/. You should see the following...
Step 5: Setup Sonar to start as a Windows Service. Double-click C:\Program Files\sonar-3.0\bin\windows-x86-64\InstallNTService.bat. If your machine is 32-bit, run C:\Program Files\sonar-3.0\bin\windows-x86-32\InstallNTService.bat instead.
Step 6: Restart the computer.
Step 7: Verify again that it's running. The Sonar Windows service should start Sonar when the machine boots up. Open up a browser and go to: http://localhost:9000/. For administration features, the Sonar default login/password is admin/admin.
Apparently, Sonar is trying to write to a temp file and Windows is not letting it. After all failed attemps to create the Temp folder manually and remove the write protection, I ended up solving the issue by manually configuring the Windows Service. The Sonar Windows Service's "user" was LocalSystem by default. I had to switch the service over to run under a regular user, and that fixed the issue.
Piece of Cake!!!
sonarsource.org
Step 1: Download Sonar from the Sonar download website.

Step 2: Unzip the .zip file and move the entire 'sonar-3.0' directory to 'C:\Program Files'.
Step 3: Double-click C:\Program Files\sonar-3.0\bin\windows-x86-64\StartSonar.bat to start Sonar. If your machine is 32-bit, run C:\Program Files\sonar-3.0\bin\windows-x86-32\StartSonar.bat instead.
Step 4: Verify it's running. Open up a browser and go to: http://localhost:9000/. You should see the following...
Step 5: Setup Sonar to start as a Windows Service. Double-click C:\Program Files\sonar-3.0\bin\windows-x86-64\InstallNTService.bat. If your machine is 32-bit, run C:\Program Files\sonar-3.0\bin\windows-x86-32\InstallNTService.bat instead.
Step 6: Restart the computer.
Step 7: Verify again that it's running. The Sonar Windows service should start Sonar when the machine boots up. Open up a browser and go to: http://localhost:9000/. For administration features, the Sonar default login/password is admin/admin.
One Small Issue
After restarting the computer and checking if Sonar was running, Sonar was not running. After some digging, I found that you can look in C:\Program Files\sonar-3.0\logs\sonar.log to debug Sonar. The following log messages hinted at the problem:INFO | jvm 1 | 2012/05/02 12:55:26 | WrapperSimpleApp: Encountered an error running main: java.lang.IllegalStateException: Unable to create file in temporary directory, please check existence of it and permissions: C:\Windows\system32\config\systemprofile\AppData\Local\Temp\
INFO | jvm 1 | 2012/05/02 12:55:26 | java.lang.IllegalStateException: Unable to create file in temporary directory, please check existence of it and permissions: C:\Windows\system32\config\systemprofile\AppData\Local\Temp\
INFO | jvm 1 | 2012/05/02 12:55:26 | at org.sonar.application.StartServer.canCreateTemporaryFiles(StartServer.java:60)
Apparently, Sonar is trying to write to a temp file and Windows is not letting it. After all failed attemps to create the Temp folder manually and remove the write protection, I ended up solving the issue by manually configuring the Windows Service. The Sonar Windows Service's "user" was LocalSystem by default. I had to switch the service over to run under a regular user, and that fixed the issue.
Piece of Cake!!!
Relevant Links
Sonar on Wikipediasonarsource.org
Sunday, April 29, 2012
Continuous Integration Using Jenkins, Git, and Maven
This tutorial demonstrates how to set up Jenkins, Git, and Maven to work together and provide a smooth continuous integration system. While the examples shown here are on a Windows machine, the concepts are the same for other operating systems such as Linux or Mac OS X, and with slight adjustments, can be adapted accordingly. This article assumes the following is installed and running on the system:
From Wikipedia: Continuous Integration, "In software engineering, continuous integration (CI) implements continuous processes of applying quality control — small pieces of effort, applied frequently. Continuous integration aims to improve the quality of software, and to reduce the time taken to deliver it, by replacing the traditional practice of applying quality control after completing all development."
From Martin Fowler: "Continuous Integration is a software development practice where members of a team integrate their work frequently, usually each person integrates at least daily - leading to multiple integrations per day. Each integration is verified by an automated build (including test) to detect integration errors as quickly as possible. Many teams find that this approach leads to significantly reduced integration problems and allows a team to develop cohesive software more rapidly."
1.a. Check 'Enable security'
1.b. Choose 'Jenkins's own user database'
1.c. Uncheck 'Allow users to sign up'
1.d. Choose 'Matrix-based security'
1.e. Enter an admin username next to 'User/group to add:'
1.f. Check all rights for the user.

1.g. Click 'Save'
1.h. Enter log in information for the admin user in the form that appears.

Step 2: Add a JDK. From the Jenkins dashboard, navigate to 'Manage Jenkins' and then 'Configure System'.
2.a. Click 'Add JDK' and enter Name and JAVA_HOME.

2.b. Click 'Apply'
Step 3: Add Maven information.
3.a. Click 'Add Maven' and enter Name and MAVEN_HOME.

3.c. Click 'Save'
Step 4: Add Git information.
4.a. From the Jenkins dashboard, navigate to 'Manage Jenkins' and then 'Manage Plugins'.
4.b Click on the 'Available' tab and search using the browser (CTRL+F) for 'git plugin'.
4.c. Check 'Git Plugin' and click 'Download now and install after restart'. The install can take a while.
4.d. From the Jenkins dashboard, navigate to 'Manage Jenkins' and then 'Configure System'.
4.e. Add Git information.

4.f. Add Git user and email info under section "Git Plugin".

4.g. Click 'Save'.
Step 5: Configure a Jenkins Job.
5.a. From the Jenkins dashboard, navigate to 'New Job'.
5.b. Enter a 'Job Name' and select 'Build a maven2/3 project'. Click 'OK'.

5.c. Enter a 'Description'.
5.d. Select 'Discard Old Builds'.
5.e. Enter an amount by 'Max # of builds to keep'.

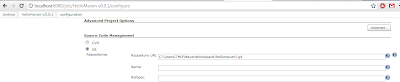
5.f. Select 'Git' and enter a 'Repository URL'. If you wanted to track a git repo on Github, this is where you would enter the git URL.
5.g. Check 'Poll SCM' and add '* * * * *' to 'Schedule'. '* * * * *' is a cron expression which means 'every minute'.
5.h. Under 'Build' add a Maven goal in 'Goals and options'.

5.i. Click 'Save'.
Step 6: Run the Job.
6.a. From the Jenkins dashboard, run the new job by clicking the clock with arrow icon on the far right. If everything is set up correctly, the job should run and a blue ball should appear. You may have to refresh the page after the job runs to refresh the ball.

If you need to debug a Jenkins job either while it is running or after it is finished, you can view console output. From the dashboard, click on the job name. Once on the job's page, hover over a link in the 'Build History' section and select 'Console Output'.

Also, when you push new commits to the git repo, Jenkins should recognize that and start the job automatically.
Piece of Cake!!!
Hello World - Maven, M2Eclipse and Eclipse
Setup Git on Windows
- Jenkins (install tutorial)
- Git (install tutorial)
- Maven (install tutorial)
Why CI?
Continuous integration attempts to automate building and testing of source code at regular intervals in order to alert a team as early as possible about problems and merging issues.From Wikipedia: Continuous Integration, "In software engineering, continuous integration (CI) implements continuous processes of applying quality control — small pieces of effort, applied frequently. Continuous integration aims to improve the quality of software, and to reduce the time taken to deliver it, by replacing the traditional practice of applying quality control after completing all development."
From Martin Fowler: "Continuous Integration is a software development practice where members of a team integrate their work frequently, usually each person integrates at least daily - leading to multiple integrations per day. Each integration is verified by an automated build (including test) to detect integration errors as quickly as possible. Many teams find that this approach leads to significantly reduced integration problems and allows a team to develop cohesive software more rapidly."
Configure Jenkins
Step 1: Enable security. From the Jenkins dashboard, navigate to 'Manage Jenkins' and then 'Configure System'. Note: Newer versions have this under "Configure Global Security" instead.1.a. Check 'Enable security'
1.b. Choose 'Jenkins's own user database'
1.c. Uncheck 'Allow users to sign up'
1.d. Choose 'Matrix-based security'
1.e. Enter an admin username next to 'User/group to add:'
1.f. Check all rights for the user.

1.g. Click 'Save'
1.h. Enter log in information for the admin user in the form that appears.

Step 2: Add a JDK. From the Jenkins dashboard, navigate to 'Manage Jenkins' and then 'Configure System'.
2.a. Click 'Add JDK' and enter Name and JAVA_HOME.

2.b. Click 'Apply'
Step 3: Add Maven information.
3.a. Click 'Add Maven' and enter Name and MAVEN_HOME.

3.c. Click 'Save'
Step 4: Add Git information.
4.a. From the Jenkins dashboard, navigate to 'Manage Jenkins' and then 'Manage Plugins'.
4.b Click on the 'Available' tab and search using the browser (CTRL+F) for 'git plugin'.
4.c. Check 'Git Plugin' and click 'Download now and install after restart'. The install can take a while.
4.d. From the Jenkins dashboard, navigate to 'Manage Jenkins' and then 'Configure System'.
4.e. Add Git information.

4.f. Add Git user and email info under section "Git Plugin".

4.g. Click 'Save'.
Step 5: Configure a Jenkins Job.
5.a. From the Jenkins dashboard, navigate to 'New Job'.
5.b. Enter a 'Job Name' and select 'Build a maven2/3 project'. Click 'OK'.

5.c. Enter a 'Description'.
5.d. Select 'Discard Old Builds'.
5.e. Enter an amount by 'Max # of builds to keep'.

5.f. Select 'Git' and enter a 'Repository URL'. If you wanted to track a git repo on Github, this is where you would enter the git URL.

5.g. Check 'Poll SCM' and add '* * * * *' to 'Schedule'. '* * * * *' is a cron expression which means 'every minute'.
5.h. Under 'Build' add a Maven goal in 'Goals and options'.

5.i. Click 'Save'.
Step 6: Run the Job.
6.a. From the Jenkins dashboard, run the new job by clicking the clock with arrow icon on the far right. If everything is set up correctly, the job should run and a blue ball should appear. You may have to refresh the page after the job runs to refresh the ball.

If you need to debug a Jenkins job either while it is running or after it is finished, you can view console output. From the dashboard, click on the job name. Once on the job's page, hover over a link in the 'Build History' section and select 'Console Output'.

Also, when you push new commits to the git repo, Jenkins should recognize that and start the job automatically.
Piece of Cake!!!
Helpful Links
Install Jenkins on Windows as a Windows ServiceHello World - Maven, M2Eclipse and Eclipse
Setup Git on Windows
Saturday, April 28, 2012
Install Jenkins on Windows as a Windows Service
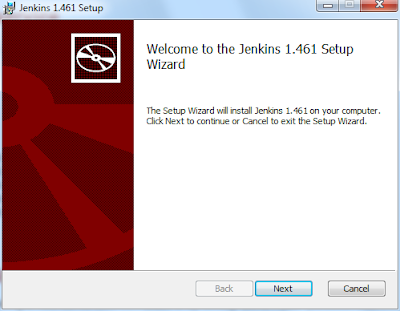
Installing Jenkins on Windows and setting up a Jenkins Windows Service, which starts Jenkins automatically whenever Windows is restarted is now easier than ever since there is a Jenkins Windows install wizard for it. This short tutorial shows how to setup Jenkins on Windows.
Step 1: Download the Windows native package from the Jenkins main website.

Step 2: Unpack the .zip file.
Step 3: Click through the install wizard.


Step 4: Verify that Jenkins is running. Open up a browser and go to: http://localhost:8080/. You should see the following:

Piece of Cake!
Step 1: Download the Windows native package from the Jenkins main website.

Step 2: Unpack the .zip file.
Step 3: Click through the install wizard.


Step 4: Verify that Jenkins is running. Open up a browser and go to: http://localhost:8080/. You should see the following:

Piece of Cake!
Labels:
Java
Subscribe to:
Posts (Atom)