Eclipse
Step 1: Download Eclipse. Download the lastest version of Eclipse at the Main Eclipse download page. You can download which ever flavor of Eclipse you like the best. I chose Eclipse IDE for J2EE Developers.
Step 2: Install Eclipse. Unpack the Eclipse .zip file and move the entire folder 'eclipse' to the 'Programs' folder on the hard drive.
M2Eclipse
Step 3. In Eclipse, go to Help --> 'Eclipse Marketplace...' and search for 'Maven'. Click on 'Install' for the m2eclipse plugin title 'Maven Integration for Eclipse'.
Step 4: Click through the wizard, installing m2eclipse.
Maven (Optional)
Installing Maven is optional because M2Eclipse does have its own embedded version of Maven. I chose to install Maven separately for two reasons. First, I wanted the latest and greatest version of Maven. Secondly, I plan to run a CI server (Jenkins) that needs access to Maven, and I wanted M2Eclipse and Jenkins to both use the same Maven install. If you don't plan on installing Maven separetely, skip to step 10.Step 5: Download Maven. Download the lastest version of Maven at the Main Apache Maven download page choosing the binary .zip file for Windows.

Step 6: Install Maven. Unpack the Maven .zip file and move the entire folder 'apache-maven.x.x.x' to the 'Programs' folder on the hard drive.
Step 7: Set environment variables (adjust according to your setup):
JAVA_HOME C:\Program Files\Java\jdk1.6.0_25
M2_HOME C:\Program Files\apache-maven-3.0.4
M2 %M2_HOME%\bin
Path ;%M2%;%JAVA_HOME%\bin
Step 8: Verify Maven install with 'mvn -- version' at the command line. Note, if you had the command line open before changing the environment variables, close it and reopen it.
>mvn --version
Apache Maven 3.0.4 (r1232337; 2012-01-17 09:44:56+0100)
Maven home: C:\Program Files\apache-maven-3.0.4
Java version: 1.6.0_25, vendor: Sun Microsystems Inc.
Java home: C:\Program Files\Java\jdk1.6.0_25\jre
Default locale: de_DE, platform encoding: Cp1252
OS name: "windows 7", version: "6.1", arch: "x86", family: "windows"
Step 9: Configure m2eclipse. In Eclipse, go to Window --> Preferences
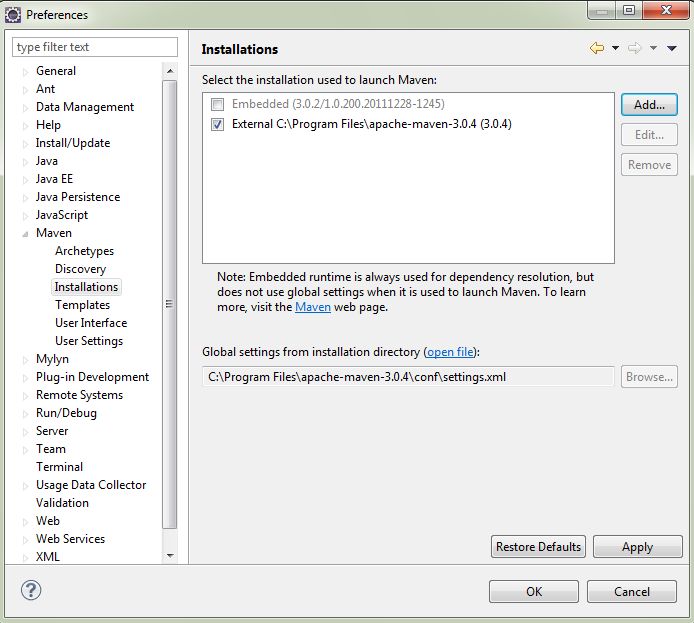
9.a. Under Maven --> Installations, specify an external Maven install by clicking 'Add...' next to 'Select the installation used to launch Maven'. By default m2eclipse selects it's own embedded Maven version.
9.b. Under Maven --> User Settings, specify a settings.xml by clicking 'Browse...'. I chose to put the settings.xml file inside Mave's conf folder.
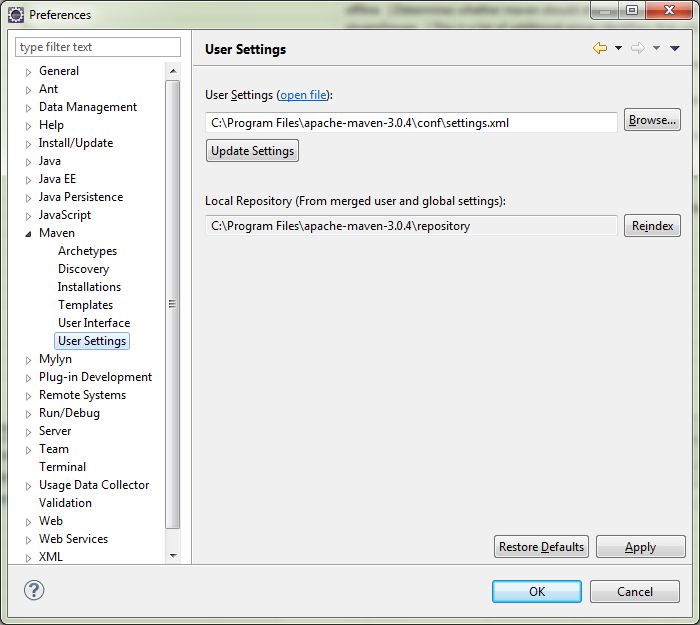
9.c. Edit the settings.xml file and specify the location of the local Maven repository. I chose 'C:\Program Files\apache-maven-3.0.4\repository'. After editing settings.xml click the 'Update Settings' in 'User Settings' from the previous step.

A repository in Maven is used to hold build artifacts and dependencies of varying types. The local repository refers to a copy on your own installation that is a cache of the remote downloads, and also contains the temporary build artifacts that you have not yet released.
Hello World
Step 10: Create Maven Project in Eclipse.10.a. In Eclipse open the New Project Wizard by clicking File --> New --> Project. Under 'Maven' select 'Maven Project' and click 'Next'.

10.b. On the next page of the wizard, check 'Create a simple project' and click 'Next'.

10.c. Give a 'Group Id' and an 'Artifact Id' and click 'Finish'.

Step 11: Create a class with a main method in src/main/java. In this case I created MelloMavenMain.java.

Step 12: In the main method, log a message using slf4j. I chose to use a 3rd party library to do this to demonstrated how to depend on 3rd party libraries in the next step.

Logger logger = LoggerFactory.getLogger(HelloMavenMain.class);
logger.info("Hello Maven!");
Step 13: Add the slf4j dependency in the project's pom.xml file.

Step 14: Package your program. Right-click on the project and choose Run As... --> 'Maven Install'. This will create a jar file for your project in the 'target' directory.org.slf4j slf4j-simple 1.6.4
Piece of Cake!!!
Helpful Links
Maven Documentationm2eclipse
Maven Eclipse Plugin
8 comments:
Nice! Nice!! Nice!! Keep Posting!!
I have to say this is how these things should be written. Great job
Hey,
Thanks for the post!
FYI:
I had to fix case of
groupid --> groupId
artifactid --> artifactId.
Best,
Shakhal
Hey!
Thanks for the post!
FYI
I had to fix case of
groupid --> groupId
artifactid --> artifactId
in step 13, dependency code.
Best,
Shakhal
Great! Thank you!
Really useful and well explained thanks!
Great tutorial, thanks!
nicely explained..saved me quite some time :)
Post a Comment