Installing Jenkins on Windows and setting up a Jenkins Windows Service, which starts Jenkins automatically whenever Windows is restarted is now easier than ever since there is a Jenkins Windows install wizard for it. This short tutorial shows how to setup Jenkins on Windows.
Step 1: Download the Windows native package from the Jenkins main website.
Step 2: Unpack the .zip file.
Step 3: Click through the install wizard.
Step 4: Verify that Jenkins is running. Open up a browser and go to: http://localhost:8080/. You should see the following:
Piece of Cake!
Saturday, April 28, 2012
Force Google Chrome to use google.com as the Default Search Engine with Omnibox
As an American living abroad, it's somewhat annoying that the default search engine in Google Chrome in conjunction with Chrome's Omnibox is set to google.ch rather than google.com. Here's what I did to force Chrome to use google.com. You could adjust the following to suit your particular needs.
Step 1: Open Settings in Google Chrome.
Step 2: Under 'Basics', click on 'Manage Search Engines...'
Step 3: Delete all the search engines that are present.
Step 4: Set up a new entry with the following as the URL (all one line):
https://google.com/search?{google:RLZ}{google:acceptedSuggestion}{google:originalQueryForSuggestion}{google:searchFieldtrialParameter}{google:instantFieldTrialGroupParameter}sourceid=chrome&ie={inputEncoding}&q=%s
Step 5: Add the new entry as the default search engine. The setting should look something like this:
Piece of Cake!!!
Step 1: Open Settings in Google Chrome.
Step 2: Under 'Basics', click on 'Manage Search Engines...'
Step 3: Delete all the search engines that are present.
Step 4: Set up a new entry with the following as the URL (all one line):
https://google.com/search?{google:RLZ}{google:acceptedSuggestion}{google:originalQueryForSuggestion}{google:searchFieldtrialParameter}{google:instantFieldTrialGroupParameter}sourceid=chrome&ie={inputEncoding}&q=%s
Step 5: Add the new entry as the default search engine. The setting should look something like this:
Piece of Cake!!!
Friday, April 27, 2012
Hello World - Maven, M2Eclipse and Eclipse
This tutorial takes you through all steps needed to create a Hello World Java Application using Maven, M2Eclipse and Eclipse from scratch. The instructions are geared toward a Windows machine, but you should probably be able to easily adapt the steps to apply to Linux or Mac OS X.
Step 2: Install Eclipse. Unpack the Eclipse .zip file and move the entire folder 'eclipse' to the 'Programs' folder on the hard drive.
Step 4: Click through the wizard, installing m2eclipse.
Step 5: Download Maven. Download the lastest version of Maven at the Main Apache Maven download page choosing the binary .zip file for Windows.
Step 6: Install Maven. Unpack the Maven .zip file and move the entire folder 'apache-maven.x.x.x' to the 'Programs' folder on the hard drive.
Step 7: Set environment variables (adjust according to your setup):
JAVA_HOME C:\Program Files\Java\jdk1.6.0_25
M2_HOME C:\Program Files\apache-maven-3.0.4
M2 %M2_HOME%\bin
Path ;%M2%;%JAVA_HOME%\bin
Step 8: Verify Maven install with 'mvn -- version' at the command line. Note, if you had the command line open before changing the environment variables, close it and reopen it.
Step 9: Configure m2eclipse. In Eclipse, go to Window --> Preferences
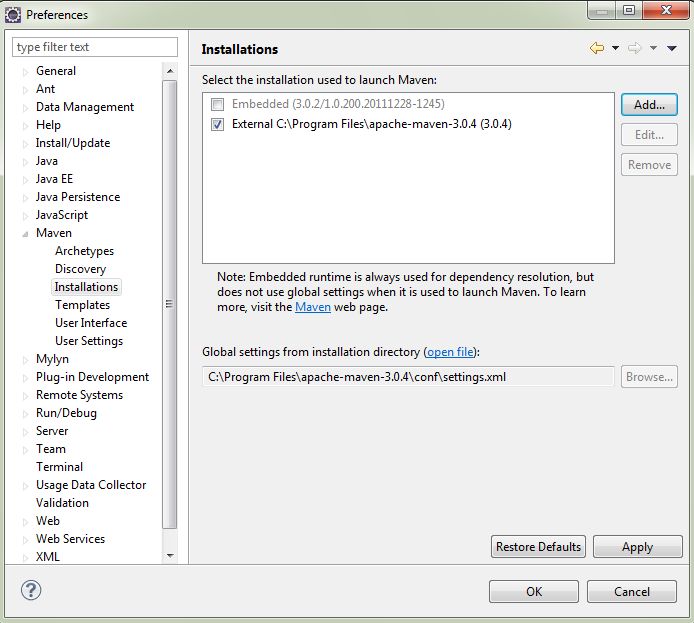
9.a. Under Maven --> Installations, specify an external Maven install by clicking 'Add...' next to 'Select the installation used to launch Maven'. By default m2eclipse selects it's own embedded Maven version.
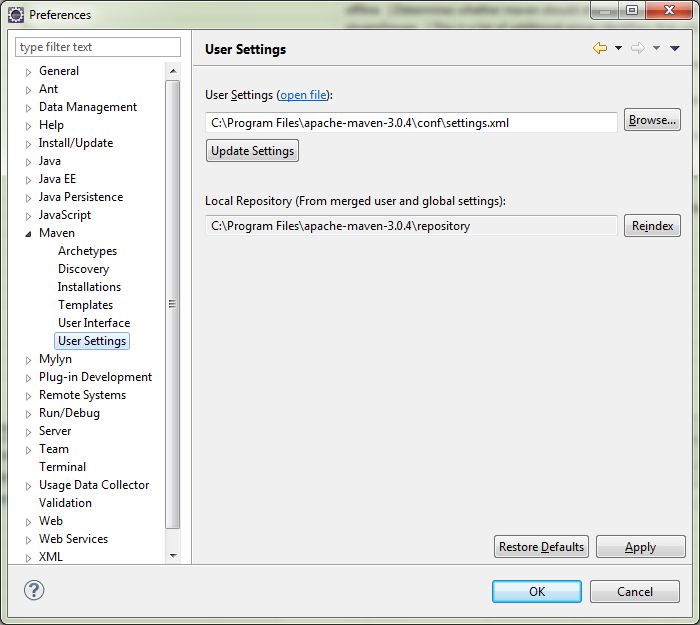
9.b. Under Maven --> User Settings, specify a settings.xml by clicking 'Browse...'. I chose to put the settings.xml file inside Mave's conf folder.
9.c. Edit the settings.xml file and specify the location of the local Maven repository. I chose 'C:\Program Files\apache-maven-3.0.4\repository'. After editing settings.xml click the 'Update Settings' in 'User Settings' from the previous step.
A repository in Maven is used to hold build artifacts and dependencies of varying types. The local repository refers to a copy on your own installation that is a cache of the remote downloads, and also contains the temporary build artifacts that you have not yet released.
10.a. In Eclipse open the New Project Wizard by clicking File --> New --> Project. Under 'Maven' select 'Maven Project' and click 'Next'.
10.b. On the next page of the wizard, check 'Create a simple project' and click 'Next'.
10.c. Give a 'Group Id' and an 'Artifact Id' and click 'Finish'.
Step 11: Create a class with a main method in src/main/java. In this case I created MelloMavenMain.java.
Step 12: In the main method, log a message using slf4j. I chose to use a 3rd party library to do this to demonstrated how to depend on 3rd party libraries in the next step.
Step 13: Add the slf4j dependency in the project's pom.xml file.
Piece of Cake!!!
m2eclipse
Maven Eclipse Plugin
Eclipse
Step 1: Download Eclipse. Download the lastest version of Eclipse at the Main Eclipse download page. You can download which ever flavor of Eclipse you like the best. I chose Eclipse IDE for J2EE Developers.Step 2: Install Eclipse. Unpack the Eclipse .zip file and move the entire folder 'eclipse' to the 'Programs' folder on the hard drive.
M2Eclipse
Step 3. In Eclipse, go to Help --> 'Eclipse Marketplace...' and search for 'Maven'. Click on 'Install' for the m2eclipse plugin title 'Maven Integration for Eclipse'.Step 4: Click through the wizard, installing m2eclipse.
Maven (Optional)
Installing Maven is optional because M2Eclipse does have its own embedded version of Maven. I chose to install Maven separately for two reasons. First, I wanted the latest and greatest version of Maven. Secondly, I plan to run a CI server (Jenkins) that needs access to Maven, and I wanted M2Eclipse and Jenkins to both use the same Maven install. If you don't plan on installing Maven separetely, skip to step 10.Step 5: Download Maven. Download the lastest version of Maven at the Main Apache Maven download page choosing the binary .zip file for Windows.
Step 6: Install Maven. Unpack the Maven .zip file and move the entire folder 'apache-maven.x.x.x' to the 'Programs' folder on the hard drive.
Step 7: Set environment variables (adjust according to your setup):
JAVA_HOME C:\Program Files\Java\jdk1.6.0_25
M2_HOME C:\Program Files\apache-maven-3.0.4
M2 %M2_HOME%\bin
Path ;%M2%;%JAVA_HOME%\bin
Step 8: Verify Maven install with 'mvn -- version' at the command line. Note, if you had the command line open before changing the environment variables, close it and reopen it.
>mvn --version
Apache Maven 3.0.4 (r1232337; 2012-01-17 09:44:56+0100)
Maven home: C:\Program Files\apache-maven-3.0.4
Java version: 1.6.0_25, vendor: Sun Microsystems Inc.
Java home: C:\Program Files\Java\jdk1.6.0_25\jre
Default locale: de_DE, platform encoding: Cp1252
OS name: "windows 7", version: "6.1", arch: "x86", family: "windows"
Apache Maven 3.0.4 (r1232337; 2012-01-17 09:44:56+0100)
Maven home: C:\Program Files\apache-maven-3.0.4
Java version: 1.6.0_25, vendor: Sun Microsystems Inc.
Java home: C:\Program Files\Java\jdk1.6.0_25\jre
Default locale: de_DE, platform encoding: Cp1252
OS name: "windows 7", version: "6.1", arch: "x86", family: "windows"
Step 9: Configure m2eclipse. In Eclipse, go to Window --> Preferences
9.a. Under Maven --> Installations, specify an external Maven install by clicking 'Add...' next to 'Select the installation used to launch Maven'. By default m2eclipse selects it's own embedded Maven version.
9.b. Under Maven --> User Settings, specify a settings.xml by clicking 'Browse...'. I chose to put the settings.xml file inside Mave's conf folder.
9.c. Edit the settings.xml file and specify the location of the local Maven repository. I chose 'C:\Program Files\apache-maven-3.0.4\repository'. After editing settings.xml click the 'Update Settings' in 'User Settings' from the previous step.
A repository in Maven is used to hold build artifacts and dependencies of varying types. The local repository refers to a copy on your own installation that is a cache of the remote downloads, and also contains the temporary build artifacts that you have not yet released.
Hello World
Step 10: Create Maven Project in Eclipse.10.a. In Eclipse open the New Project Wizard by clicking File --> New --> Project. Under 'Maven' select 'Maven Project' and click 'Next'.
10.b. On the next page of the wizard, check 'Create a simple project' and click 'Next'.
10.c. Give a 'Group Id' and an 'Artifact Id' and click 'Finish'.
Step 11: Create a class with a main method in src/main/java. In this case I created MelloMavenMain.java.
Step 12: In the main method, log a message using slf4j. I chose to use a 3rd party library to do this to demonstrated how to depend on 3rd party libraries in the next step.
Logger logger = LoggerFactory.getLogger(HelloMavenMain.class);
logger.info("Hello Maven!");
Step 13: Add the slf4j dependency in the project's pom.xml file.
Step 14: Package your program. Right-click on the project and choose Run As... --> 'Maven Install'. This will create a jar file for your project in the 'target' directory.org.slf4j slf4j-simple 1.6.4
Piece of Cake!!!
Helpful Links
Maven Documentationm2eclipse
Maven Eclipse Plugin
Tuesday, April 24, 2012
Fixing Unsatisfiedlinkerror - Can't Find Dependent Libraries
After I finally got my Java JNI code working on my Windows development machine that sets the local time of the computer from Java, I discovered it was not working on the production machine. I got the dreaded Unsatisfiedlinkerror - Can't Find Dependent Libraries runtime error. Following is an explanation of why it was happening and what I did to fix it...
What the heck is MSVCR100.DLL?? It turns out it's added by Visual Studio C++ during the build of the DLL, and it is NOT necessary.
The Cause - Visual Studio C++ 2010 Express
In order to find what dependent library was missing on the production machine that was present on my development machine, I downloaded and installed Dependency Walker. After analyzing my generated DLL I saw something unexpected.What the heck is MSVCR100.DLL?? It turns out it's added by Visual Studio C++ during the build of the DLL, and it is NOT necessary.
The Solution
There seem to be several solutions to this problem, but the most elegant in my opinion to to configure Visual Studio to not make the built DLL dependent on it in the first place. Here's how to do that: Right click on the DLL project and open up the properties dialog. Under Configuration Properties -> C/C++ -> Code Generation -> Runtime Library select "Multi-threaded (/MT)". source Rebuild your DLL and verify with Dependency Walker that the rogue dependency is gone. Piece of Cake!!!Monday, April 23, 2012
Uninstall Stubborn Java JRE or JDK from Windows
Having trouble uninstalling or fixing Java from a Windows 7 machine like I did? I somehow managed to mess up my Java installation and was receiving an error 1723 along the way while trying to uninstall the 64-bit version of Java 6 (in my case version 6.0.31). It was complaining about not being able to find a certain file which it apparently needed for the uninstall. What I did was the following:
Step 1: Locate the following folder:
C:\Users\<User>\AppData\LocalLow\Sun\Java\jdk1.7.0_x64
and make a copy of it in
C:\Users\<User>\AppData\LocalLow\Sun\Java
If it isn't there, you need to downlaod and install Java jdk1.7.0_x64.
Step 2: Rename the copied folder to
C:\Users\<User>\AppData\LocalLow\Sun\Java\jdk1.6.0_31_64
Step 3: Rename
C:\Users\<User>\AppData\LocalLow\Sun\Java\jdk1.6.0_31_64\jdk1.7.0.msi
to
C:\Users\<User>\AppData\LocalLow\Sun\Java\jdk1.6.0_31_64\jdk1.6.0_31.msi
Following those steps combined with some restarting of Windows allowed me to Uninstall my corrupt Java 6 version. Make sure you replace <User> above with your Windows user name. I hope that helps someone!
Step 1: Locate the following folder:
C:\Users\<User>\AppData\LocalLow\Sun\Java\jdk1.7.0_x64
and make a copy of it in
C:\Users\<User>\AppData\LocalLow\Sun\Java
If it isn't there, you need to downlaod and install Java jdk1.7.0_x64.
Step 2: Rename the copied folder to
C:\Users\<User>\AppData\LocalLow\Sun\Java\jdk1.6.0_31_64
Step 3: Rename
C:\Users\<User>\AppData\LocalLow\Sun\Java\jdk1.6.0_31_64\jdk1.7.0.msi
to
C:\Users\<User>\AppData\LocalLow\Sun\Java\jdk1.6.0_31_64\jdk1.6.0_31.msi
Following those steps combined with some restarting of Windows allowed me to Uninstall my corrupt Java 6 version. Make sure you replace <User> above with your Windows user name. I hope that helps someone!
Friday, April 6, 2012
Sunday, March 25, 2012
Saturday, March 17, 2012
Subscribe to:
Posts (Atom)