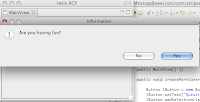
 This article shows how to use JFace messages boxes in an RCP application and builds off of a clean RCP Application with a View. The full source code is found at the end of the article. Most if not all GUI applications frequently use message boxes to give or get information to or from the user. Jface provides us with 5 commonly used message boxes which can be conveniently used via a single static method. The available message boxes are:
- MessageDialog.openQuestion()
- MessageDialog.openInformation()
- MessageDialog.openWarning()
- MessageDialog.openConfirm()
- MessageDialog.openError()
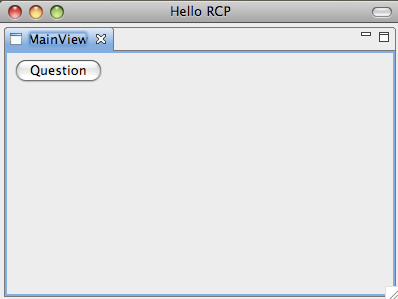
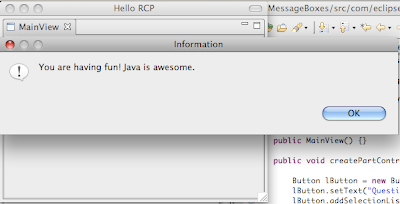
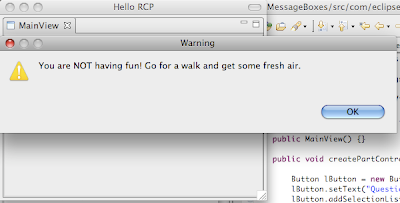
To demonstrate the JFace Message Boxes used in an Eclipse RCP application, a view containing a single button is created. When the button is clicked, a Question message box pops up, and depending on the boolean value returned, opens up either a Warning or an Information message box.
Step 0: Create an Eclipse RCP Application with a View.
Step 1: Add code to the createPartControl() method in the application's view to add a button and set its action listener, coding the calls to the JFace message box static methods.
package com.eclipsercptutorials.jfacemessageboxes;

import org.eclipse.jface.dialogs.MessageDialog;
import org.eclipse.swt.SWT;
import org.eclipse.swt.events.SelectionAdapter;
import org.eclipse.swt.events.SelectionEvent;
import org.eclipse.swt.layout.RowLayout;
import org.eclipse.swt.widgets.Button;
import org.eclipse.swt.widgets.Composite;
import org.eclipse.swt.widgets.Shell;
import org.eclipse.ui.PlatformUI;
import org.eclipse.ui.part.ViewPart;

public class MainView extends ViewPart {

public static final String ID = "com.eclipsercptutorials.JFaceMessageBoxes.MainView"; // the ID needs to match the id set in the view's properties

public MainView() {}

public void createPartControl(Composite parent) {

Composite lMainViewComposite = new Composite(parent, SWT.NONE);

Button lButton = new Button(lMainViewComposite, SWT.PUSH);
lButton.setText("Question");
lButton.addSelectionListener(new SelectionAdapter(){
public void widgetSelected(SelectionEvent event){

Shell lShell = PlatformUI.getWorkbench().getActiveWorkbenchWindow().getShell();

boolean isHavingFun = MessageDialog.openQuestion(lShell, "Information", "Are you having fun?");

if(isHavingFun){

MessageDialog.openInformation(lShell, "Information", "You are having fun! Java is awesome.");

}else{

MessageDialog.openWarning(lShell, "Warning", "You are NOT having fun! Go for a walk and get some fresh air.");

}
}
});

lMainViewComposite.setLayout(new RowLayout()); // this sets a Layout for the view's Composite

}

public void setFocus() {}

}
Step 2. Run the application and test if everything worked. Your application should now have a view with a single button that triggers a JFace question message box to pop up, and depending on the boolean value returned, opens up either a Warning or an Information message box:


Piece of Cake!!
<--- Previous - Add a Menu to a View in an Eclipse RCP Application
Also see: Eclipse RCP Tutorial Table of Contents
No comments:
Post a Comment