$ md5 -r /path/to/file/filename.ext
Showing posts with label Mac. Show all posts
Showing posts with label Mac. Show all posts
Wednesday, January 4, 2012
Check MD5 Hash on Mac OS X
The following command can be used to calculate the md5sum of a file on a Mac running OSX, functioning the same as the md5sum command in Linux...
Labels:
Mac

Monday, August 1, 2011
Pull Entire Directory Using SCP on a Mac
The following command can be used to fetch an entire directory including all the files from a remote host to a local directory.
An alternative approach is to reference a directory relative to the user's account.
Or using '.', the files will be copied to the current working direcory
To use a wildcard to fetch only certain file types use the * syntax.
Piece of Cake!!!
$ scp -r username@host:/fully/qualified/path/on/remote/host/ /fully/qualified/path/on/local/host/
An alternative approach is to reference a directory relative to the user's account.
$ scp -r username@host:user's/path/on/remote/host/ user's/path/on/local/host/
Or using '.', the files will be copied to the current working direcory
$ scp -r username@host:user's/path/on/remote/host/ .
To use a wildcard to fetch only certain file types use the * syntax.
$ scp -r username@host:user's/path/on/remote/host/*.png .
Piece of Cake!!!
Labels:
Mac
Monday, May 2, 2011
Port Forwarding (80 to 8080 for Tomcat) Using IPFW on Mac OSX
Here I show how easy it is to set up port forwarding (80 to 8080 for Tomcat) on Mac OSX using ipfw from the Terminal. IPFW is the built-in firewall of Mac OSX and we can quickly set up a firewall rule to allow port forwarding...
Step 1: View current firewall rules.
Step 2: Add port forwarding rule (80 to 8080 for Tomcat)
If you want to remove your firewall rules run:
Piece of Cake!!!
Step 1: View current firewall rules.
sudo ipfw show
Step 2: Add port forwarding rule (80 to 8080 for Tomcat)
sudo ipfw add 100 fwd 127.0.0.1,8080 tcp from any to any 80 in
If you want to remove your firewall rules run:
sudo ipfw flush
Piece of Cake!!!
Labels:
Mac
Wednesday, April 20, 2011
Disable Spotlight on Mac OSX
Victory! After years of being somewhat irritated about the mdsworker and mds process running in the background and causing my fan to go on sometimes, I finally decided to do something about it. I never use Spotlight anyway so why not get rid it that and save some CPU cycles? There are many suggestions and tricks out there to disable Spotlight on Mac OSX, but most of them didn't make sense to me or didn't do exactly what I wanted when I tried them. The solution that I settled on here is the most effective, reversible, and safest in my opinion.
First a little background about OSX. When your mac boots up, it runs several property-list files (*.plist) via launchd, a unified, open source service management framework for starting, stopping and managing daemons, applications, processes, and scripts. So if we don't want Spotlight to start up and we don't want the mds process to index your drive(s), all we need to do it prevent launchd from starting the plist files that start these processes.
Here's how you do that (tested on Mac OSX Leopard 10.5)...
Piece of Cake!!!
**Disclaimer - Use at your own risk. And remember, don't believe everything you read on the Internet! :)
First a little background about OSX. When your mac boots up, it runs several property-list files (*.plist) via launchd, a unified, open source service management framework for starting, stopping and managing daemons, applications, processes, and scripts. So if we don't want Spotlight to start up and we don't want the mds process to index your drive(s), all we need to do it prevent launchd from starting the plist files that start these processes.
Here's how you do that (tested on Mac OSX Leopard 10.5)...
Spotlight
Open up Terminal, and run the command:sudo launchctl unload -w /System/Library/LaunchAgents/com.apple.Spotlight.plist
MDS, MDSWORKER
In Terminal, run the command:sudo launchctl unload -w /System/Library/LaunchDaemons/com.apple.metadata.mds.plist
Spotlight's Index Files
To get rid of Spotlight's files run the following command in Terminal:sudo rm -r /.Spotlight-V100
Getting Spotlight back
If you change your mind after diabling Spotlight, all you need to do to start it again is to run the following commands in Terminal:sudo launchctl load -w /System/Library/LaunchAgents/com.apple.Spotlight.plist
sudo launchctl load -w /System/Library/LaunchDaemons/com.apple.metadata.mds.plist
Piece of Cake!!!
**Disclaimer - Use at your own risk. And remember, don't believe everything you read on the Internet! :)
References:
launchctl
Labels:
Mac
Sunday, February 13, 2011
My Mac OS X MySQL Cheat Sheet
Using MySQL and Java? Check out an easier way: Yank
Following is my Mac OS X MySQL cheat sheet. Normally I use a great open source SQL client called Sequel Pro for my SQL work, but every now and then I need to log into MySQL directly using Terminal for some advanced options.
Log In
/usr/local/mysql/bin/mysql -u root -p
Create Database
create database DATABASE_NAME;
Show Databases
show databases;
Use Table
use TABLE_NAME;
Indexes
show index from TABLE_NAME;
Drop Table
drop table TABLE_NAME;
Truncate
truncate table TABLE_NAME;
See also: Uninstall MySQL on Mac OS X
And also: Install MySQL on Mac OS X
And also: Installing and Running Tomcat on Mac OS X
And also: Set MySQL Server System Variables on Mac OS X
Labels:
Mac
Saturday, February 12, 2011
My Mac OS X Filesystem Permissions Cheat Sheet
With Mac OS X being a Unix-based Operating System, we can use the Terminal application to get under the hood of the OS and perform many advanced operations. One the the most basic Unix or Linux command line operations or set of operations deals with file permissions. Here, I have accumulated revavent information and commands to filesystem permissions general to *nix and also specific to a mac.
-F appends a character revealing the nature of a file, for example, * for an executable, or / for a directory. Regular files have no suffix.
-a lists all files in the given directory, including those whose names start with "." (which are hidden files in Unix). By default, these files are excluded from the list.
-R recursively lists subdirectories. The command ls -R / would therefore list all files.
-d shows information about a symbolic link or directory, rather than about the link's target or listing the contents of a directory.
-t sort the list of files by modification time.
-h print sizes in human readable format. (e.g., 1K, 234M, 2G, etc.)
rwx=red/write/execute, rwx truple=user/group/others
@=attributes, use xattr -l filename to view them
next comes the user owner, then the group owner, then file size, then last modified, then name
7 full
6 read and write
5 read and execute
4 read only
3 write and execute
2 write only
1 execute only
0 none
2770, the first bit (2) in a 4-bytle chmod is for setuid and setgid permissions. See: techrepublic.com
ls-Wikipedia
anselmbradford
chown-Wikipedia
chmod
setuid
Users and Groups
Listing
dscl . -list /Groups PrimaryGroupID
dscl . -list /Users UniqueID
dscl . -list /Users UniqueID
Creating a non-standard user
First, choose a User ID and a Group ID which is not already in use, which must be a positive integer, lower than 500.sudo dscl . -create /Groups/_tomcat PrimaryGroupID 107
sudo dscl . -create /Groups/_tomcat RealName "Tomcat Users"
sudo dscl . -create /Groups/_tomcat Password \*
sudo dscl . -create /Users/_tomcat UniqueID 107
sudo dscl . -create /Users/_tomcat PrimaryGroupID 107
sudo dscl . -create /Users/_tomcat HomeDirectory /usr/local/tomcat
sudo dscl . -create /Users/_tomcat UserShell /usr/bin/false
sudo dscl . -create /Users/_tomcat RealName "Tomcat Administrator"
sudo dscl . -create /Users/_tomcat Password \*
Choosing /usr/bin/false as the UserShell, and setting the Password to “*” turns this account unusable as a standard user account. The _name convention is used for non-standard accounts.sudo dscl . -create /Groups/_tomcat RealName "Tomcat Users"
sudo dscl . -create /Groups/_tomcat Password \*
sudo dscl . -create /Users/_tomcat UniqueID 107
sudo dscl . -create /Users/_tomcat PrimaryGroupID 107
sudo dscl . -create /Users/_tomcat HomeDirectory /usr/local/tomcat
sudo dscl . -create /Users/_tomcat UserShell /usr/bin/false
sudo dscl . -create /Users/_tomcat RealName "Tomcat Administrator"
sudo dscl . -create /Users/_tomcat Password \*
List Files - ls
ls -lhFa
Arguments
-l long format, displaying Unix file types, permissions, number of hard links, owner, group, size, date, and filename-F appends a character revealing the nature of a file, for example, * for an executable, or / for a directory. Regular files have no suffix.
-a lists all files in the given directory, including those whose names start with "." (which are hidden files in Unix). By default, these files are excluded from the list.
-R recursively lists subdirectories. The command ls -R / would therefore list all files.
-d shows information about a symbolic link or directory, rather than about the link's target or listing the contents of a directory.
-t sort the list of files by modification time.
-h print sizes in human readable format. (e.g., 1K, 234M, 2G, etc.)
Explained
drwxr-xr-x@ 14 root wheel 476B Feb 12 00:12 ./
drwxr-xr-x 6 root wheel 204B Feb 10 22:11 ../
-rw-r--r--@ 1 root wheel 55K Feb 4 13:51 LICENSE
-rw-r--r--@ 1 root wheel 1.2K Feb 4 13:51 NOTICE
-rw-r--r--@ 1 root wheel 8.6K Feb 4 13:51 RELEASE-NOTES
-rw-r--r--@ 1 root wheel 6.5K Feb 4 13:51 RUNNING.txt
drwxr-xr-x@ 26 root wheel 884B Feb 12 00:55 bin/
drwxr-xr-x@ 9 root wheel 306B Feb 12 01:07 conf/
drwxr-xr-x@ 21 root wheel 714B Feb 10 23:40 lib/
drwxrws---@ 24 _tomcat admin 816B Feb 12 00:55 logs/
drwxrws--- 6 _tomcat admin 204B Feb 12 00:12 static/
drwxrws---@ 6 _tomcat admin 204B Feb 12 12:40 temp/
drwxrws---@ 12 _tomcat admin 408B Feb 12 00:49 webapps/
drwxrws---@ 4 _tomcat admin 136B Feb 12 01:08 work/
d=directory, -=normal file, l=symbolic linkdrwxr-xr-x 6 root wheel 204B Feb 10 22:11 ../
-rw-r--r--@ 1 root wheel 55K Feb 4 13:51 LICENSE
-rw-r--r--@ 1 root wheel 1.2K Feb 4 13:51 NOTICE
-rw-r--r--@ 1 root wheel 8.6K Feb 4 13:51 RELEASE-NOTES
-rw-r--r--@ 1 root wheel 6.5K Feb 4 13:51 RUNNING.txt
drwxr-xr-x@ 26 root wheel 884B Feb 12 00:55 bin/
drwxr-xr-x@ 9 root wheel 306B Feb 12 01:07 conf/
drwxr-xr-x@ 21 root wheel 714B Feb 10 23:40 lib/
drwxrws---@ 24 _tomcat admin 816B Feb 12 00:55 logs/
drwxrws--- 6 _tomcat admin 204B Feb 12 00:12 static/
drwxrws---@ 6 _tomcat admin 204B Feb 12 12:40 temp/
drwxrws---@ 12 _tomcat admin 408B Feb 12 00:49 webapps/
drwxrws---@ 4 _tomcat admin 136B Feb 12 01:08 work/
rwx=red/write/execute, rwx truple=user/group/others
@=attributes, use xattr -l filename to view them
next comes the user owner, then the group owner, then file size, then last modified, then name
CHOWN
Arguments
-R recursiveExplained
sudo chown root file.txt
sudo chown -R root:wheel .
sudo chown root:_tomcat conf/tomcat-users.xml
sudo chown _tomcat:admin logs temp webapps work
root=user, wheel=groupsudo chown -R root:wheel .
sudo chown root:_tomcat conf/tomcat-users.xml
sudo chown _tomcat:admin logs temp webapps work
CHMOD
Arguments
-R recursiveExplained
sudo chmod 644 conf/*
sudo chmod 640 conf/tomcat-users.xml
sudo chmod 2770 logs temp webapps work
sudo chmod -R 2770 /usr/local/tomcat/static
rwx=red/write/execute, rwx truple=user/group/otherssudo chmod 640 conf/tomcat-users.xml
sudo chmod 2770 logs temp webapps work
sudo chmod -R 2770 /usr/local/tomcat/static
7 full
6 read and write
5 read and execute
4 read only
3 write and execute
2 write only
1 execute only
0 none
2770, the first bit (2) in a 4-bytle chmod is for setuid and setgid permissions. See: techrepublic.com
References:
Joel's Writingsls-Wikipedia
anselmbradford
chown-Wikipedia
chmod
setuid
Labels:
Mac
Friday, February 11, 2011
Debugging a Launchd Configuration on Mac OS X
Recently I set up a launchd configuration on my macbook that starts Tomcat up automatically during bootup. Of course it didn't work until after man hours of trial and error and combing Google for answers with a fine toothed comb. During part of the ordeal I came across a couple terminal commands for debugging Launchd. Here they are:
1. set the launcdctr log level to debug
sudo launchctl log level debug (debug, info, notice, warning, error, critical, alert, emergency)
2. Tail the system.log
tail -f /var/log/system.log
3. set the launcdctr log level back to error
sudo launchctl log level error
The possible log levels are as follows: debug, info, notice, warning, error, critical, alert, emergency.
Useful links I came across:
Creating launchd Daemons and Agents
Joel's Writings
Sunday, November 15, 2009
Setup Tomcat and Connector/J MySQL Connector
Using MySQL and Java? Check out an easier way: Yank
If you plan to create a Java Web Application which runs in Tomcat and accesses a MySQL database you'll need to add a Connector/J MySQL Connector Jar to the Tomcat installation. That's all you should really need for setting up Tomcat and Connector/J. Here's how to do that in detail assuming you already have Tomcat installed.
Step 1: Download the most current release of the Connector/J MySQL Connector from mysql.com and unpack the *.tar.gz file.

Step 2: Inside the unpacked folder you'll find a Jar called "mysql-connector-java-5.1.10-bin.jar" or something similar. Copy that file into Tomcat's "lib" directory.
Step 3: Restart Tomcat.
Piece of Cake!!
Labels:
Mac
Wednesday, November 11, 2009
Unpack a Java .war file on Mac OX S
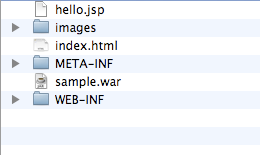
Unpacking Java .war file on a Mac is not hard at all. For this demonstration, I'll use the sample.war file that comes with the Tomcat Installation.
Step 1: Fire up the terminal
Step 2: cd to the directory where the .war resides. In this case I moved it from the Tomcat directories to /sample beforehand.
Step 3: Unpack the .war with the following command:
The contents of the .war are unpacked for you and placed in the same folder as the .war file.
Piece of Cake!!
Step 1: Fire up the terminal

Step 2: cd to the directory where the .war resides. In this case I moved it from the Tomcat directories to /sample beforehand.
# cd /sampleStep 3: Unpack the .war with the following command:
# jar -xvf sample.warThe contents of the .war are unpacked for you and placed in the same folder as the .war file.

Piece of Cake!!
Labels:
Mac
Sunday, November 8, 2009
Installing and Running Tomcat on Mac OS X
Using MySQL and Java? Check out an easier way: Yank
Installing Tomcat on Mac OS X should be easy, and it is, if you follow these instructions exactly.

Step 1: Get Tomcat. Go to tomcat.apache.org and download the version of Tomcat you need. Download the "Core" distribution with the tar.gz extension and unzip it (double-click the file).
Step 2: Install Tomcat. Move the contents of the unzipped file to /Library/Tomcat, creating the folder "Tomcat" in "Library" if it is not there already. That's it. Tomcat is installed.
Step 3: Fire up the terminal.
Step 4: Start Tomcat.
# sh /Library/Tomcat/bin/startup.sh Step 5: Test if it worked. Use your browser to go to: http://127.0.0.1:8080/ You should see the default Tomcat homepage running from your newly installed Tomcat server.

Step 6: Shutdown Tomcat:
# sh /Library/Tomcat/bin/shutdown.shOptional steps to deploy a sample .war file!
Step 7: Point your browser to: http://127.0.0.1:8080/docs/appdev/sample/
Step 8: Download the sample .war file found on the above page and place it in /Library/Tomcat/webapps. Tomcat will recognize and load the .war file.
Step 9: Point your browser to: http://localhost:8080/sample/ to view the sample webapp.

By the way, Tomcat can be found in the Activity Monitor with the name "java". If Tomcat ever hangs and you need to kill the process, just use Activity Monitor to do so.

Piece of Cake!!
See also: MacBook Hard Drive Upgrade Instructions
And also: Install MySQL on Mac OS X
Labels:
Mac
Sunday, October 18, 2009
MacBook Hard Drive Upgrade Instructions
This article shows how to upgrade the hard drive in a Macbook while keeping all existing files, software, settings, and preferences intact.
First, a note about MacBooks and hard drive capacity. The info out there in the interwebs regarding the maximum HD capacity a MacBook can be upgraded to in unclear. In my experience, upgrading above 250GB is ill-advised, however many people have left comments that they've had no problems at all. In a previous article I wrote, 500GB MacBook Harddrive Upgrade for Under $100, the issue came up from some commentors that the hard drive controllers in certain MacBook motherboards couldn't handle HDs with more than 250GB capacity. The upgrade and subsequent use will work, but when the HD starts to fill up to the ~250GB level, problems and perhaps data corruption/loss will occur. I was able to verify this with Apple, that for my MacBook, greater then 250GB wouldn't be a good idea, but for other newer models it is OK. How to tell which models can be upgraded to what, I couldn't find out. After learning this, I chose to downgrade the 500GB HD in my MacBook which I installed previously and use that as an external data backup device.
Disclaimer: Before you attempt this, backup all your data! Perform this upgrade at your own risk. This worked for me, but I can't guarantee it will work for you! Consider any warranty issues this might cause and call Apple first to see if this will void your warranty and/or AppleCare Protection Plan. Take Electrostatic Discharge (ESD) precautions when handling the hard drive out of it's case or handling any raw circuitry with with your hands. It's never a good idea to directly touch electrical components on a Printed Circuit Board (PCB), but having said that, if you are properly grounded no damage will occur. All you need to do is touch something connected to the ground with your finger to neutralize any static charge your body may be holding before you touch the electronics. If you're not sure of what you're doing, proceed with caution (but do proceed so you learn something new)! I performed this upgrade on my all-white MacBook I bought in October 2007, which is running Mac OSX 10.5.5.
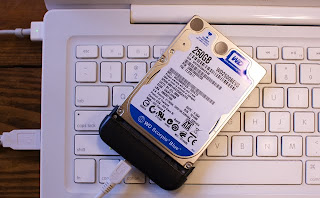
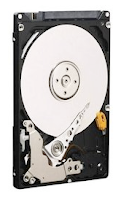
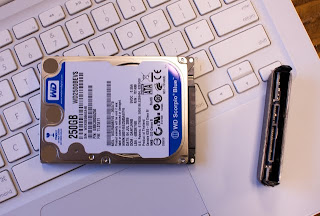
Step 1: Buy a 150GB internal laptop hard drive and an external hard drive enclosure. What's important is the HD needs to have a 2.5 inch form factor and a SATA 2 interface. The enclosure must be the USB/SATA type. The exact hard drive and hard drive enclosure I used were:
 Link: Western Digital Scorpio
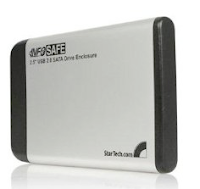 Link: StarTech InfoSafe
Step 2: Connect the hard drive to a free USB port using the USB to SATA connector that is part of the external HD enclosure. Simply connect the HD to the USB/SATA connector and plug the connector into your computer using a USB cable.
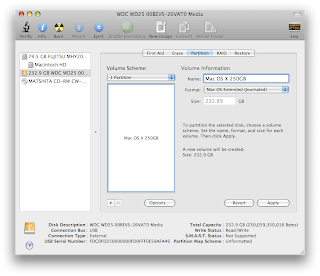
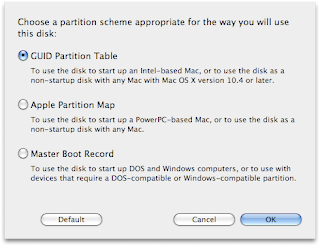
Step 3: Partition the external drive as a GUID Partition Table drive. The drive must be partitioned this way if you ever want to upgrade the OS in the future for an Intel-based Mac. Open Disk Utility and select the external hard drive in the left column. Select the "Partition" tab. Select "1 Partition" as the Volume Scheme. You can give the volume a name now if you like, but you can always change it later. Choose "Mac OS Extended (Journaled)" as the Format. Click on the "Options..." button and choose the "GUID Partition Table". Click "OK" and then "Apply".
Step 4: Use SuperDuper! to clone your current bootable harddrive image to the external drive. This free software will quickly and easily make an exact copy of your current OS image including all your software, existing files, settings, and preferences - it only takes a few clicks.
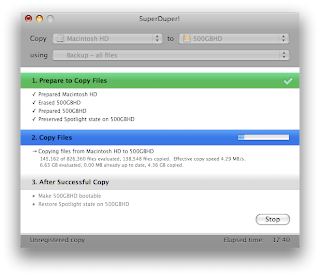
With the external harddrive plugged in the USB port, run SuperDuper! Select: Copy "Macintosh HD" to "250GB HD" (or whatever it's named in your case) using "Backup - all files" and click the "Copy Now" button. After an hour or so depending on how much data you have, the external hard drive will be an exact copy of the hard drive inside your MacBook. While you're waiting, you could check out How to Build a 24-Core Linux Cluster in a $29.99 IKEA Cabinet or How to Identify Bacteria on Your Hands Using DNA Sequencing. Once the cloning is complete you can do a test and boot from the newly created bootable image on the external hard drive by restarting your MacBook and holding the option key. This will let you choose which disk you'd like to boot from. You should be able to boot from the external hard drive at this point and it will look like you booted from the internal hard drive that you just cloned.
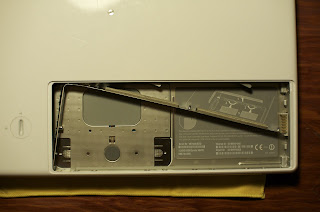
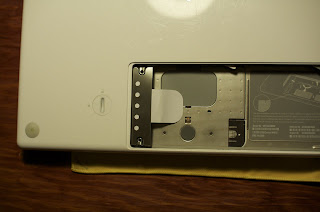
Step 5: Swap the external hard drive with the internal hard drive. Apple made it very easy to replace hard drives on the MacBook. By the way, for this step, unplug the power from your laptop and shut the computer down. For a complete guide how to do this, you can download Apple's Hard Drive Replacement Instructions. First, remove the battery on the bottom of the laptop using a coin to unlock it. With the laptop flipped upside down and the battery removed, unscrew three little screws using a small Phillips head screw driver that hold a retaining clip. You don't have to fully remove the screws from the retaining clip to remove it. Once the retaining clip is removed, fish out the white plastic flap and pull to slide out the internal hard drive.
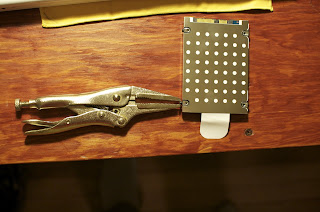
With the old hard drive out, remove the metal sheath from it by taking out the four screws. The screws require a star-tipped screwdriver. Because I didn't have that, I just used a pliers to grab onto the screw heads and twist them out. With the old hard drive now completely out, take the new one and in reverse order of taking the old one out, put the new one in.
Step 6: Turn on your MacBook and enjoy your extra space. After you reassembled your MacBook, you should just be able to turn it on like normal and it will boot up from the newly-installed 500GB hard drive. Everything will look and behave just like before except now you'll have tons of extra space! You can right click on the hard drive in Finder and choose "Get Info" and rename the hard drive to something like "MacBook HD" if you like.
Step 7: Put the external HD case to good use. Either put the old hard drive into the external HD case and use it for a file backup or get an additional 250GB HD for the case and regularly use SuperDuper! to clone the internal 250GB HD onto the external one. That way if your internal HD ever dies, you have a clone ready to swap into your MacBook in about 5 minutes and continue with your work right where you left off!
Piece of cake!!

First, a note about MacBooks and hard drive capacity. The info out there in the interwebs regarding the maximum HD capacity a MacBook can be upgraded to in unclear. In my experience, upgrading above 250GB is ill-advised, however many people have left comments that they've had no problems at all. In a previous article I wrote, 500GB MacBook Harddrive Upgrade for Under $100, the issue came up from some commentors that the hard drive controllers in certain MacBook motherboards couldn't handle HDs with more than 250GB capacity. The upgrade and subsequent use will work, but when the HD starts to fill up to the ~250GB level, problems and perhaps data corruption/loss will occur. I was able to verify this with Apple, that for my MacBook, greater then 250GB wouldn't be a good idea, but for other newer models it is OK. How to tell which models can be upgraded to what, I couldn't find out. After learning this, I chose to downgrade the 500GB HD in my MacBook which I installed previously and use that as an external data backup device.
Disclaimer: Before you attempt this, backup all your data! Perform this upgrade at your own risk. This worked for me, but I can't guarantee it will work for you! Consider any warranty issues this might cause and call Apple first to see if this will void your warranty and/or AppleCare Protection Plan. Take Electrostatic Discharge (ESD) precautions when handling the hard drive out of it's case or handling any raw circuitry with with your hands. It's never a good idea to directly touch electrical components on a Printed Circuit Board (PCB), but having said that, if you are properly grounded no damage will occur. All you need to do is touch something connected to the ground with your finger to neutralize any static charge your body may be holding before you touch the electronics. If you're not sure of what you're doing, proceed with caution (but do proceed so you learn something new)! I performed this upgrade on my all-white MacBook I bought in October 2007, which is running Mac OSX 10.5.5.
Step 1: Buy a 150GB internal laptop hard drive and an external hard drive enclosure. What's important is the HD needs to have a 2.5 inch form factor and a SATA 2 interface. The enclosure must be the USB/SATA type. The exact hard drive and hard drive enclosure I used were:
Link: Western Digital ScorpioLink: StarTech InfoSafeStep 2: Connect the hard drive to a free USB port using the USB to SATA connector that is part of the external HD enclosure. Simply connect the HD to the USB/SATA connector and plug the connector into your computer using a USB cable.

Step 3: Partition the external drive as a GUID Partition Table drive. The drive must be partitioned this way if you ever want to upgrade the OS in the future for an Intel-based Mac. Open Disk Utility and select the external hard drive in the left column. Select the "Partition" tab. Select "1 Partition" as the Volume Scheme. You can give the volume a name now if you like, but you can always change it later. Choose "Mac OS Extended (Journaled)" as the Format. Click on the "Options..." button and choose the "GUID Partition Table". Click "OK" and then "Apply".


Step 4: Use SuperDuper! to clone your current bootable harddrive image to the external drive. This free software will quickly and easily make an exact copy of your current OS image including all your software, existing files, settings, and preferences - it only takes a few clicks.

With the external harddrive plugged in the USB port, run SuperDuper! Select: Copy "Macintosh HD" to "250GB HD" (or whatever it's named in your case) using "Backup - all files" and click the "Copy Now" button. After an hour or so depending on how much data you have, the external hard drive will be an exact copy of the hard drive inside your MacBook. While you're waiting, you could check out How to Build a 24-Core Linux Cluster in a $29.99 IKEA Cabinet or How to Identify Bacteria on Your Hands Using DNA Sequencing. Once the cloning is complete you can do a test and boot from the newly created bootable image on the external hard drive by restarting your MacBook and holding the option key. This will let you choose which disk you'd like to boot from. You should be able to boot from the external hard drive at this point and it will look like you booted from the internal hard drive that you just cloned.
Step 5: Swap the external hard drive with the internal hard drive. Apple made it very easy to replace hard drives on the MacBook. By the way, for this step, unplug the power from your laptop and shut the computer down. For a complete guide how to do this, you can download Apple's Hard Drive Replacement Instructions. First, remove the battery on the bottom of the laptop using a coin to unlock it. With the laptop flipped upside down and the battery removed, unscrew three little screws using a small Phillips head screw driver that hold a retaining clip. You don't have to fully remove the screws from the retaining clip to remove it. Once the retaining clip is removed, fish out the white plastic flap and pull to slide out the internal hard drive.


With the old hard drive out, remove the metal sheath from it by taking out the four screws. The screws require a star-tipped screwdriver. Because I didn't have that, I just used a pliers to grab onto the screw heads and twist them out. With the old hard drive now completely out, take the new one and in reverse order of taking the old one out, put the new one in.

Step 6: Turn on your MacBook and enjoy your extra space. After you reassembled your MacBook, you should just be able to turn it on like normal and it will boot up from the newly-installed 500GB hard drive. Everything will look and behave just like before except now you'll have tons of extra space! You can right click on the hard drive in Finder and choose "Get Info" and rename the hard drive to something like "MacBook HD" if you like.
Step 7: Put the external HD case to good use. Either put the old hard drive into the external HD case and use it for a file backup or get an additional 250GB HD for the case and regularly use SuperDuper! to clone the internal 250GB HD onto the external one. That way if your internal HD ever dies, you have a clone ready to swap into your MacBook in about 5 minutes and continue with your work right where you left off!
Piece of cake!!
Labels:
Mac
Tuesday, August 18, 2009
Uninstall MySQL on Mac OS X
Using MySQL and Java? Check out an easier way: Yank
Uninstalling MySQL on Mac OS X is very easy - you just have to delete some files. Here you will find instructions to delete both MySQL and the MySQL Startup Item, which you may have installed following the instructions found here: Install MySQL on Mac OS X. Be aware that doing this will delete all your MySQL databases and data.
Step 1: Uninstall MySQL. Fire up the Terminal and type in:
cd /usr/local , hit enter, type in: ls , hit enter, and verify that there are two items called "mysql" and "mysql-5.1.37-osx10.5-x86_64" (or similar). These are the two items you want to delete. Type in: sudo rm mysql , hit enter, type in: sudo rm -rf mysql-5.1.37-osx10.5-x86_64 , and hit enter. You'll need to enter your password at some point when prompted.
Step 2: Uninstall the MySQL Startup Item. In Termainl type in:
cd /Library/StartupItems , hit enter, type in: ls , hit enter, and verify that there is an item called "MySQLCOM". This is the item you want to delete. Type in: sudo rm -rf MySQLCOM , and hit enter. You'll need to enter your password at some point when prompted. Piece of cake!!
See also: Install MySQL on Mac OS X
And also: Installing and Running Tomcat on Mac OS X
And also: Set MySQL Server System Variables on Mac OS X
And also: My Mac OS X MySQL Cheat Sheet
Labels:
Mac
Monday, August 17, 2009
Install MySQL on Mac OS X
Using MySQL and Java? Check out an easier way: Yank
Update: I just verified that the 10.6 version works on Mountain Lion 10.8.
There are already several instructions out there on how to install MySQL on Mac OS X, but most of them are either outdated or more complicated than they need to be. Here you will find an easy tutorial showing how to install MySQL, start it up, access it as the default root user, create a database, delete the database and exit.
AI-Receptionist.com
Tired of missing important calls or battling endless spam while trying to run your business? AI Receptionist offers a revolutionary solution: a smart, 24/7 multilingual AI phone assistant designed for busy professionals, solopreneurs, and small businesses. It intelligently filters unwanted calls, provides fluid, human-like responses to customer inquiries in multiple languages based on your custom knowledge base, and seamlessly replaces outdated voicemail and clunky call trees. Elevate your customer interactions and ensure no opportunity is missed, day or night. Getting started with AI Receptionist is fast and effortless, allowing you to present a polished, professional image in minutes, often at a fraction of the cost of traditional receptionists or competing services. Beyond standard call handling, gain unique advantages like the innovative 'Boss Mode' for quick verbal updates on call activity while on the go, and benefit from direct founder support. Transform your business communications and experience the future of call management by visiting ai-receptionist.com to start your free trial today.Step 1: Download MySQL. Go to the downloads page at mysql.com. Under the section "MySQL Community Server" click on the "Download" link. Find the particular version of MySQL that is appropriate for your OS and machine architecture. In my case, I downloaded the "Mac OS X 10.5 (x86, 64-bit)" version because I have Mac OS X 10.5 running on a MacBook with a 64-bit Intel processor. You want to download the DMG Archive, not the compressed TAR Archive.
Note: Use the 10.6 version for Snow Leopard, Lion, and Mountain Lion.

Step 2: Access the installers. Go the the directory where the .dmg file was downloaded to and mount the .dmg file by double clicking it. The .dmg contains the MySQL and MySQL Startup installer packages as well as the MySQL.prefPane.

Step 3: Install MySQL and the MySQL Startup Item. Double-clicking on mysql*.pkg icon starts an installer wizard that takes you through a few intuitive installation steps. Once you click through the wizard and accept a license agreement you should see the "install succeeded" page. Repeat for MySQLStartupItem.pkg and MySQL.prefPane.

Step 4: Verify Install. Fire up the Terminal and type in:
cd /usr/local
, hit enter, type in: ls
, and verify that there are two items. The Mac OS X .pkg of MySQL installs itself into /usr/local/mysql-VERSION and /usr/local/mysql.
Step 5: Restart your computer. When the computer reboots, it will startup the database server allowing you to connect to it. You can also probably start MySQL without rebooting by starting it through the MySQL preference Pane under System Preferences although I haven't tried that. If you prefer the command line, the start and stop commands are listed at the bottom of this article.
Step 6: Use MySQL. Type in:
/usr/local/mysql/bin/mysql -u root -p
The last part of the command tells it you want to start it up as the root user and that you'd like to be prompted for a password. By default the root's password is blank, so when you are prompted for it, just hit enter. You are now using MySQL, and you can tell it what to do at the MySQL command prompt:mysql>

Note about error 2002 people are reporting!
If after installing MySQL and trying to use MySQL as root user as in step 6, and you see this following error:
ERROR 2002 (HY000): Can't connect to local MySQL server through socket '/tmp/mysql.sock' (2)
, it's probably because MySQL is installed but not yet running. Make sure you've started MySQL as outlined in Step 5. To verify that it's running, open up Activity Monitor and under "All Processes", verify you see the process "mydqld".

If you installed the preference pane, you should also see there that MySQL is running.

Step 7: Create a database, delete it and exit MySQL. At the mysql> prompt, type in:
create database mynewdatabase;
Verify that it was created by typing in:show databases;
You should see the database along with the default databases. Delete the database by typing in:drop database mynewdatabase;
Verify that it was deleted by typing in: show databases;
Exit MySQL by typing in:exit;

Piece of Cake!!
In addition, here are the commands you need to start and stop MySQL:
sudo /Library/StartupItems/MySQLCOM/MySQLCOM stop

sudo /Library/StartupItems/MySQLCOM/MySQLCOM start

sudo /Library/StartupItems/MySQLCOM/MySQLCOM restart
See also: Uninstall MySQL on Mac OS X
And also: Installing and Running Tomcat on Mac OS X
And also: Set MySQL Server System Variables on Mac OS X
And also: My Mac OS X MySQL Cheat Sheet
Labels:
Mac
Tuesday, October 21, 2008
500GB MacBook Harddrive Upgrade for Under $100
 Because of the following two warnings, I created a new article containing easier upgrade instructions and addressing the issue of the 250GB limitation in some MacBooks: MacBook Hard Drive Upgrade Instructions
Warning #2! (Also see warning #1 directly below.) On July 30, 2009, cjewelz left a comment below saying that he called Apple AS centre about the maximum size they would recommend upgrading to and they said 320 GB. According to cjewelz they said upgrading to 500GB would cause overheating. My MacBook has not had any overheating issues with a 500GB HD. However, I contacted Apple, and what they told me is that my MacBook can be upgraded to a maximum of only 250GB because the HD controller on the motherboard can only handle up to a 250 GB hard drive. I guess this means that when my 500GB HD fills up to ~250GB, weird stuff will occur and my HD will possibly be corrupted and un-useable. I remember calling Apple around the time that I did the upgrade asking about upgrade options and they told me that they could only upgrade to 250GB, but if I brought in a 500GB HD, they would install it for me (for some cost). Hmmm... Mixed messages... So it seems like a 250GB or less upgrade is OK, a 320GB may be not OK, and 500GB is bad. I haven't yet found any website which lists MacBook hard drive size limits according to the different MacBook models. If I get a more concrete understanding of the HD size limitations, I'll post the information so others have it and link to it from here. Proceed with caution.
Warning#1 As of February 25th, 2009, two readers have left comments regarding the Western Digital 500GB Passport Essential external harddrive featured in this article. Apparently the design of the HD has been changed, and you can no longer disconnect the SATA to USB connector from the main harddrive because it is manufactured as one piece. One reader reports a one-piece HD bought in the UK and dated January 2009. If you end up with one of the one-piece HDs, you won't be able to successfully complete the upgrade as described in this article.
However, most of this article is still relevant as reader Zack pointed out. Here is his comment: "Even though the Passports are not compatible anymore this upgrade is still easy and very affordable. I opted to get a drive and enclosure separately rather than the passport and spent $107.68. The quality of the enclosure may not be as good as the Passport enclosure but it's still really small and nice enough. I still recommend and encourage this upgrade and just told someone else about it today."
Following is a hard drive and an enclosure that would work for the upgrade. What's important is the HD needs to have a 2.5 inch form factor and a SATA 2 interface. The enclosure must be the USB/SATA type.
Link: Western Digital ScorpioLink: StarTech InfoSafeStart of original article:
The 80GB harddrive that came with my white MacBook I bought a over a year ago (October, 2007) has become the limiting factor of my computing productivity. For example, if I want to tap into my entire mp3 collection through iTunes and have all my pictures in iPhoto while I use the computer, I'm well over 80 GB and am forced to use an external harddrive. With only two USB ports on a MacBook and one of them taken up by an external harddrive, I'm constantly swapping peripheral device USB cables in the remaining port. I love everything else about my MacBook and wouldn't want to upgrade my entire computer yet, and a 500GB harddrive would extend my use of it for at least two more years. Faced with this challenge, I set out to do the upgrade myself and avoid the offensive fees Apple would charge for the upgrade to a maximal measly 250GB.
In a nutshell, to upgrade to a 500GB harddrive on your MacBook while keeping all your existing files, software, settings, and preferences intact for less than $100, follow these simple steps:
- Buy a 500GB external harddrive for ~$150 or less.
- Partition the external drive as a GUID Partition Table drive
- Use SuperDuper! to clone your current bootable harddrive image to the external drive
- Disassemble the external hardrive enclosure
- Swap the external harddrive with the internal harddrive
- Turn on your MacBook and enjoy your extra space
- Repackage the old harddrive into the external harddrive enclosure
- Sell your 80GB external harddrive on Craigslist or eBay for ~$50
Warning: Before you attempt this, backup all your data! Perform this upgrade at your own risk. This worked for me, but I can't guarantee it will work for you! Consider any warranty issues this might cause and call Apple first to see if this will void your warranty and/or AppleCare Protection Plan. Take Electrostatic Discharge (ESD) precautions when handling the harddrive out of it's case or handling any raw circuitry with with your hands. It's never a good idea to directly touch electrical components on a Printed Circuit Board (PCB), but having said that, if you are properly grounded no damage will occur. All you need to do is touch something connected to the ground with your finger to neutralize any static charge your body may be holding before you touch the electronics. If you're not sure of what you're doing, proceed with caution (but do proceed so you learn something new)! I performed this upgrade on my all-white MacBook I bought in October 2007, which is running Mac OSX 10.5.5.
Step 1 - Buy a ~$150 2.5 inch form-factor 500GB external harddrive. The key is to buy one that has a SATA interface, which the vast majority do these days. You can find a good deal on a 500GB harddrive online from a reputable dealer such as Amazon.com. I ended up getting a Western Digital My Passport Essential because the price was right and I figured I could disassemble the enclosure pretty easily. With enough patience and searching, you can find this harddrive for under $150 on websites with special promotions. Update: as of Jan. 26, 2009, 500GB Western Digital My Passport Essential HDs cost only ~$115 on Amazon.com.
 Link: Western Digital My Passport
Step 2 - Partition the external drive as a GUID Partition Table drive. Eric left a comment down below that pointed out you need to have the drive partitioned this way if you ever want to upgrade the OS in the future for an Intel-based Mac. Thanks, Eric! Plug in your new external harddrive to a free USB port. Open Disk Utility and select the external harddrive in the left column. Select the "Partition" tab. Select "1 Partition" as the Volume Scheme. You can give the volume a name now if you like, but you can always change it later. Choose "Mac OS Extended (Journaled)" as the Format. Click on the "Options..." button and choose the "GUID Partition Table". Click "OK" and then "Apply".


Step 3 - Use SuperDuper! to clone your current bootable harddrive image to the external drive. This free software will quickly and easily make an exact copy of your current OS image including all your software, existing files, settings, and preferences - it only takes a few clicks.
With the external harddrive plugged in the USB port, run SuperDuper! Select: Copy "Macintosh HD" to "500GBHD" (or whatever it's named in your case) using "Backup - all files" and click the "Copy Now" button. After an hour or so depending on how much data you have, the external harddrive will be an exact copy of the harddrive inside your MacBook. While you're waiting, you could check out How to Build a 24-Core Linux Cluster in a $29.99 IKEA Cabinet or How to Identify Bacteria on Your Hands Using DNA Sequencing. Once the cloning is complete you can do a test and boot from the newly created bootable image on the external harddrive by restarting your MacBook and holding the option key. This will let you choose which disk you'd like to boot from. You should be able to boot from the external harddrive at this point and it will look like you booted from the internal harddrive that you just cloned.Step 4 - Disassemble the external hardrive enclosure. The construction of harddrives will vary, but whether it's held together by screws or just snapped together, you can probably get it apart one way or another. For the Western Digital My Passport Essential, you need to insert your fingernail or a knife between the top an bottom faces and the long side and pop the pieces apart a bit.


You need to loosen all the snaps all along the long edge, BUT NOT on the shorter edges. After the long edge is loose, gently slide the inner part out of the enclosure. I found it a bit difficult to get the sliding started so I helped it along with by twisting the tip of a flat head screw driver between the inner part and the edge of the cover. As with most things in life, having patience and not forcing things is the key to achieving your goal.


Next, carefully remove the plastic piece encircling the harddrive noting how all the pieces fit together so you'll be able to reconstruct everything with the old harddrive later. Slide the harddrive out of the metal sheath and very very carefully detach the USB connector from the SATA power and data terminals on the harddrive. You might want to use a thin blade and pry apart the connection right where they mate rather than torqueing on the USB PCB with your fingers.


Step 5 - Swap the external harddrive with the internal harddrive. Apple made it very easy to replace harddrives on the MacBook. By the way, for this step, unplug the power from your laptop and shut the computer down. For a complete guide how to do this, you can download Apple's Hard Drive Replacement Instructions. First, remove the battery on the bottom of the laptop using a coin to unlock it. With the laptop flipped upside down and the battery removed, unscrew three little screws using a small Phillips head screw driver that hold a retaining clip. You don't have to fully remove the screws from the retaining clip to remove it. Once the retaining clip is removed, fish out the white plastic flap and pull to slide out the old harddrive.
With the old harddrive out, remove the metal sheath from it by taking out the four screws. The screws are kinda funky because they require a star-tipped screwdriver. I just used a pliers to grab onto the screw heads and twist them out. With the old harddrive now completely out, take the new one and in reverse order of taking the old one out, put the new one in.
Step 6 - Turn on your MacBook and enjoy your extra space. After you reassembled your MacBook, you should just be able to turn it on like normal and it will boot up from the newly-installed 500GB harddrive. Everything will look and behave just like before except now you'll have tons of extra space! You can right click on the harddrive in Finder and choose "Get Info" and rename the harddrive to something like "MacBook HD" if you like.Step 7 - Repackage the old harddrive into the external harddrive enclosure. In reverse of how you disassembled the 500GB harddrive, reassemble the external harddrive package with the old 80GB harddrive being careful to gently put everything in place and slide it all together.
Step 8 - Sell your 80GB external harddrive on Craigslist or eBay for ~$50. Not only will you recoup some of the cost of the 500GB harddrive, but you'll be recycling by selling your perfectly good external harddrive to someone else who needs one. I would recommend using the Disk Utility and securely erase all the data on it though before selling it.
Piece of cake!
Labels:
Mac
Monday, October 13, 2008
How to Watermark an Image (for Free)
 JetPhoto Studio is a great little freeware application for Mac and PC for adding a watermark to your images. I spent a great deal of time trying to find a freeware program for my Mac that would add a watermark to a batch of images I wanted to publish on the web. There was plenty on freeware for a PC and plenty of software for a Mac that came with a price, but the program I desired was very elusive. One option that I wasn't too excited about was using Picasa, but you could only add text rather than an image as a watermark. After many failed Google searches, I ended up on download.com and did a search for "watermark" and filtered the results to only show results with free licences. There were four options and none looked too promising. To make a long and boring story short and exciting - I downloaded JetPhoto Studio and it rocks! The following is an illustrated guide to add a watermark to an image with JetPhoto Studio.
Step 1: Open JetPhoto Studio and create a new album, which I called "Watermark Demo".

Step 2: Drag and drop one or more images into the new album.

Step3 : Click on the "Actions" tab, and click on "Web Ready".

Step 4: Click on the "Resize" tab and select what size images you want generated. I only wanted a watermark on my demo image at a size of 1600 X 1200 pixels.

Step 5: Click on the "Watermark" tab and drag and drop your watermark mask into the rectangle. My watermark mask is white so you can't really see it too good. Select where you want the watermark positioned on your image.

Step 6: Click "Export Now!" and a folder will be placed on your desktop with your watermarked image(s).

To my delight, I have once again managed to find and use either freeware or open source software to accomplish what I need. I thank all the people (in this the case JetPhoto Studio authors and supporters) who put so much work into making free and quality software. BTW, I used Inkscape, an amazing open source application for creating professional vector graphics (like Adobe Illustrator) for my watermark. I'll probably be doing more illustrated how-to guides on other freeware and open source software for the Mac in the future.
See also: Photos of Greylag Goose with a different style watermark
Submit Photos to Shutterstock and make $$$!
Labels:
Mac
Subscribe to:
Posts (Atom)