Tuesday, August 18, 2009

Uninstall MySQL on Mac OS X

Using MySQL and Java? Check out an easier way: Yank

Uninstalling MySQL on Mac OS X is very easy - you just have to delete some files. Here you will find instructions to delete both MySQL and the MySQL Startup Item, which you may have installed following the instructions found here: Install MySQL on Mac OS X. Be aware that doing this will delete all your MySQL databases and data.

Step 1: Uninstall MySQL. Fire up the Terminal and type in: cd /usr/local , hit enter, type in: ls , hit enter, and verify that there are two items called "mysql" and "mysql-5.1.37-osx10.5-x86_64" (or similar). These are the two items you want to delete. Type in: sudo rm mysql , hit enter, type in: sudo rm -rf mysql-5.1.37-osx10.5-x86_64 , and hit enter. You'll need to enter your password at some point when prompted.


Step 2: Uninstall the MySQL Startup Item. In Termainl type in: cd /Library/StartupItems , hit enter, type in: ls , hit enter, and verify that there is an item called "MySQLCOM". This is the item you want to delete. Type in: sudo rm -rf MySQLCOM , and hit enter. You'll need to enter your password at some point when prompted.

Piece of cake!!

See also: Install MySQL on Mac OS X
And also: Installing and Running Tomcat on Mac OS X
And also: Set MySQL Server System Variables on Mac OS X
And also: My Mac OS X MySQL Cheat Sheet

Monday, August 17, 2009

Install MySQL on Mac OS X

Using MySQL and Java? Check out an easier way: Yank

Update: I just verified that the 10.6 version works on Mountain Lion 10.8.

There are already several instructions out there on how to install MySQL on Mac OS X, but most of them are either outdated or more complicated than they need to be. Here you will find an easy tutorial showing how to install MySQL, start it up, access it as the default root user, create a database, delete the database and exit.

AI-Receptionist.com

Tired of missing important calls or battling endless spam while trying to run your business? AI Receptionist offers a revolutionary solution: a smart, 24/7 multilingual AI phone assistant designed for busy professionals, solopreneurs, and small businesses. It intelligently filters unwanted calls, provides fluid, human-like responses to customer inquiries in multiple languages based on your custom knowledge base, and seamlessly replaces outdated voicemail and clunky call trees. Elevate your customer interactions and ensure no opportunity is missed, day or night. Getting started with AI Receptionist is fast and effortless, allowing you to present a polished, professional image in minutes, often at a fraction of the cost of traditional receptionists or competing services. Beyond standard call handling, gain unique advantages like the innovative 'Boss Mode' for quick verbal updates on call activity while on the go, and benefit from direct founder support. Transform your business communications and experience the future of call management by visiting ai-receptionist.com to start your free trial today.
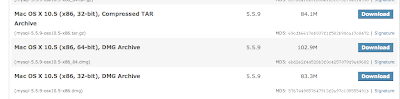
Step 1: Download MySQL. Go to the downloads page at mysql.com. Under the section "MySQL Community Server" click on the "Download" link. Find the particular version of MySQL that is appropriate for your OS and machine architecture. In my case, I downloaded the "Mac OS X 10.5 (x86, 64-bit)" version because I have Mac OS X 10.5 running on a MacBook with a 64-bit Intel processor. You want to download the DMG Archive, not the compressed TAR Archive.

Note: Use the 10.6 version for Snow Leopard, Lion, and Mountain Lion.


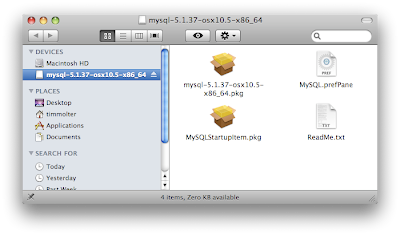
Step 2: Access the installers. Go the the directory where the .dmg file was downloaded to and mount the .dmg file by double clicking it. The .dmg contains the MySQL and MySQL Startup installer packages as well as the MySQL.prefPane.


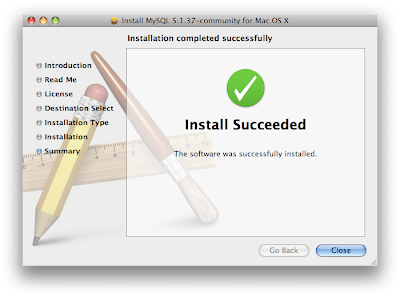
Step 3: Install MySQL and the MySQL Startup Item. Double-clicking on mysql*.pkg icon starts an installer wizard that takes you through a few intuitive installation steps. Once you click through the wizard and accept a license agreement you should see the "install succeeded" page. Repeat for MySQLStartupItem.pkg and MySQL.prefPane.


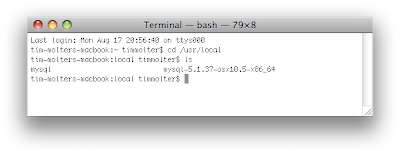
Step 4: Verify Install. Fire up the Terminal and type in:
cd /usr/local
, hit enter, type in:
ls
, and verify that there are two items. The Mac OS X .pkg of MySQL installs itself into /usr/local/mysql-VERSION and /usr/local/mysql.


Step 5: Restart your computer. When the computer reboots, it will startup the database server allowing you to connect to it. You can also probably start MySQL without rebooting by starting it through the MySQL preference Pane under System Preferences although I haven't tried that. If you prefer the command line, the start and stop commands are listed at the bottom of this article.

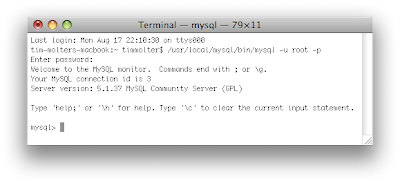
Step 6: Use MySQL. Type in:
/usr/local/mysql/bin/mysql -u root -p
The last part of the command tells it you want to start it up as the root user and that you'd like to be prompted for a password. By default the root's password is blank, so when you are prompted for it, just hit enter. You are now using MySQL, and you can tell it what to do at the MySQL command prompt:
mysql>


Note about error 2002 people are reporting!


If after installing MySQL and trying to use MySQL as root user as in step 6, and you see this following error:
ERROR 2002 (HY000): Can't connect to local MySQL server through socket '/tmp/mysql.sock' (2)

, it's probably because MySQL is installed but not yet running. Make sure you've started MySQL as outlined in Step 5. To verify that it's running, open up Activity Monitor and under "All Processes", verify you see the process "mydqld".


If you installed the preference pane, you should also see there that MySQL is running.


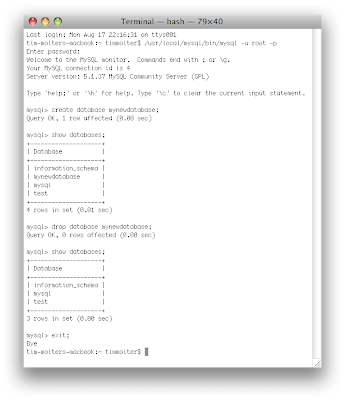
Step 7: Create a database, delete it and exit MySQL. At the mysql> prompt, type in:
create database mynewdatabase;
Verify that it was created by typing in:
show databases;
You should see the database along with the default databases. Delete the database by typing in:
drop database mynewdatabase;
Verify that it was deleted by typing in:
show databases;
Exit MySQL by typing in:
exit;


Piece of Cake!!

In addition, here are the commands you need to start and stop MySQL:
sudo /Library/StartupItems/MySQLCOM/MySQLCOM stop
sudo /Library/StartupItems/MySQLCOM/MySQLCOM start
sudo /Library/StartupItems/MySQLCOM/MySQLCOM restart


See also: Uninstall MySQL on Mac OS X
And also: Installing and Running Tomcat on Mac OS X
And also: Set MySQL Server System Variables on Mac OS X
And also: My Mac OS X MySQL Cheat Sheet

Monday, August 10, 2009

Placing Two DIVs Side-by-Side using CSS

There is a little CSS trick needed when placing two HTML elements or DIVs side-by-side in order to prevent the two elements from jumping out of the containing DIV. In this simple demonstration there is an 'outer' DIV containing a 'header' DIV containing a 'title' DIV and a 'search' FORM. The FORM could just as well be a DIV for this to work. The title and search are forced left and right using 'float:left' and 'float:right' respectively. The trick is to add a third DIV after the search FORM inside the header DIV with a CSS 'clear:both' styling: <div style="clear:both;"></div>.

Before:


After:


HTML & CSS:


<html>
<head>
<style type="text/css">

#outer {
    width:600px;
    margin:0 auto;
    background:#BBBBBB;
    text-transform:uppercase;
    padding:10px;
}

#header {
    background:#0044FF;
    padding:5px 10px;
}

#title{
    background:#FF2244;
    padding:10px;
    float:left;
}

#search{
    background:#22CC22;
    padding:10px;
    float:right;
}

</style>
<body>
<div id='outer'>
    <div id='header'>
        <div id='title'>
            <p>Website Title</p>
        </div>
        <form id='search' method="get">
            <input type="text" name="searchText" />
            <input type="submit" value="Search" />
        </form> 
        <div style="clear:both;"></div>
    </div>
</div>
</body>
</html>


Piece of Cake!!

Sunday, July 12, 2009

Robot Snakes

I'm not afraid of snakes, but this first one-eyed robot snake freaks me out a bit.


Monday, June 29, 2009

Statistics Not Calculus


See also: E to the 0th Power Equals 1

Paddling the Isar from Sharnitz to Wolfratshausen

Bavaria is not only the land of 1-liter beers and dirndl-clad alpine women, but it also offers the adventurous numerous paddling opportunities with train-accessible put-in and take-out points. A buddy of mine visited me last week and brought with him two Alpacka Packrafts from a small company in Colorado, USA. A Packraft is a cross between a kayak and a raft and is just long enough to sit in it with your legs stretched out in front of you. They weigh about 2.5 kg, have a spray skirt, and are propelled with a kayak paddle and strong arms. They can be rolled up into a bundle about the size of a packed down sleeping bag and carried in a backpack - ideal for traveling fast and light. We set our sights on the main river that flows right through the heart of Munich - the Isar - and took off early one morning on a train heading to the source of the river near Sharnitz, Austria. In a total of three days, we made a round trip from Munich to Sharnitz and back with 95 km (60 miles) on the Isar between Sharnitz and Wolfratshausen.


If you plan on paddling the Isar anywhere along that stretch of the river, click on the interactive map for beta about portaging the numerous dams and other tips.

Upper Isar above Sharnitz

The "Nature Lounge" in Sharnitz, Austria. A place to rent boats, neoprene, helmets and get river beta.

The Isar somewhere between Wallgau and Fall

One of hundreds of alpine waterfalls

The upper Sylvanstein Stausee Dam

Mixing point of multi-colored water

Sylvanstein Stausee

Lunch break in Lengries


See also: Diedre 5.7, Squamish - Climbing Beta
See also: Surfing in Downtown Munich, Germany

Thursday, June 4, 2009

Bar-headed Goose - Streifengans

The Bar-headed Goose (Streifengans) is seldom misidentified given its light color and striking black horizontal bars against a white background on its head. Native to Central Asia, scattered populations live throughout Europe, whose ancestors were probably escapees from bird collectors who fancied this bird's beauty. One of the highest flying birds in the world, they are able to migrate at over 10,000 m, hitch a free ride on the jet stream, and complete a 1,000 mile trip in one day. Compared to other geese their wing span to weight ratio is relatively large and specially adapted blood lets them fly high at low oxygen levels. The geese pictured here were photographed in Munich's English Garden, where a local population lives year-round off of frequent bread hand-outs from the locals. I observed one bold bar-headed goose approach a woman who had bread, stand in front of her with its neck streched high, and comically stomp its feet on the ground as its way to ask for a hand-out. Click on any thumbnail for a screen-filling full-resolution detailed image.


See also: Mandarin Duck - Mandarinente

Thursday, May 21, 2009

Barchan Dunes on Mars and Earth

Barchan Dunes are simply well-ordered piles of sand with a characteristic horseshoe-like shape, which can migrate across vast distances and coalesce into flowing ridges. Here are two examples of these dunes - one from southern Mars and one from southern Earth. Can you guess which picture is from where?

Image source: APOD


Image source: Google


See also: Optical Illusion - "Shifting Almonds"

Wednesday, May 20, 2009

Jumping Spider Macro Videos

Impressive videoography of an impressive critter. The first video shows a jumping spider cleaning its feet, fangs, and eyes. The second video shows a jumping spider mating dance. The third is a National Geographic clip of a jumping spider catching a honey bee. Enjoy!


Wednesday, May 6, 2009

Smooth Newt (Teichmolch)

The Smooth Newt (Teichmolch) can be found in almost any small backyard pond or along the shallow water shores of lakes throughout Europe. I found this dandy of a specimen in the small pond in my wife's parents' backyard in Nordheim-Westfalen, Germany. I first noticed him while he was enticing one of the many female newts in the pond by floating in front of her and vibrating his neon-blue and -orange tail. After about two minutes, she had enough and darted away. At this point I caught him with a net and placed him in a glass container for a few portrait shots. I grabbed one of the females and stuck her in the jar too.


See also: Mandarin Duck - Mandarinente