
First, a note about MacBooks and hard drive capacity. The info out there in the interwebs regarding the maximum HD capacity a MacBook can be upgraded to in unclear. In my experience, upgrading above 250GB is ill-advised, however many people have left comments that they've had no problems at all. In a previous article I wrote, 500GB MacBook Harddrive Upgrade for Under $100, the issue came up from some commentors that the hard drive controllers in certain MacBook motherboards couldn't handle HDs with more than 250GB capacity. The upgrade and subsequent use will work, but when the HD starts to fill up to the ~250GB level, problems and perhaps data corruption/loss will occur. I was able to verify this with Apple, that for my MacBook, greater then 250GB wouldn't be a good idea, but for other newer models it is OK. How to tell which models can be upgraded to what, I couldn't find out. After learning this, I chose to downgrade the 500GB HD in my MacBook which I installed previously and use that as an external data backup device.
Disclaimer: Before you attempt this, backup all your data! Perform this upgrade at your own risk. This worked for me, but I can't guarantee it will work for you! Consider any warranty issues this might cause and call Apple first to see if this will void your warranty and/or AppleCare Protection Plan. Take Electrostatic Discharge (ESD) precautions when handling the hard drive out of it's case or handling any raw circuitry with with your hands. It's never a good idea to directly touch electrical components on a Printed Circuit Board (PCB), but having said that, if you are properly grounded no damage will occur. All you need to do is touch something connected to the ground with your finger to neutralize any static charge your body may be holding before you touch the electronics. If you're not sure of what you're doing, proceed with caution (but do proceed so you learn something new)! I performed this upgrade on my all-white MacBook I bought in October 2007, which is running Mac OSX 10.5.5.
Step 1: Buy a 150GB internal laptop hard drive and an external hard drive enclosure. What's important is the HD needs to have a 2.5 inch form factor and a SATA 2 interface. The enclosure must be the USB/SATA type. The exact hard drive and hard drive enclosure I used were:
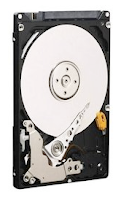 Link: Western Digital Scorpio
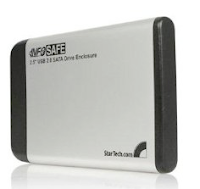 Link: StarTech InfoSafe
Step 2: Connect the hard drive to a free USB port using the USB to SATA connector that is part of the external HD enclosure. Simply connect the HD to the USB/SATA connector and plug the connector into your computer using a USB cable.

Step 3: Partition the external drive as a GUID Partition Table drive. The drive must be partitioned this way if you ever want to upgrade the OS in the future for an Intel-based Mac. Open Disk Utility and select the external hard drive in the left column. Select the "Partition" tab. Select "1 Partition" as the Volume Scheme. You can give the volume a name now if you like, but you can always change it later. Choose "Mac OS Extended (Journaled)" as the Format. Click on the "Options..." button and choose the "GUID Partition Table". Click "OK" and then "Apply".


Step 4: Use SuperDuper! to clone your current bootable harddrive image to the external drive. This free software will quickly and easily make an exact copy of your current OS image including all your software, existing files, settings, and preferences - it only takes a few clicks.

With the external harddrive plugged in the USB port, run SuperDuper! Select: Copy "Macintosh HD" to "250GB HD" (or whatever it's named in your case) using "Backup - all files" and click the "Copy Now" button. After an hour or so depending on how much data you have, the external hard drive will be an exact copy of the hard drive inside your MacBook. While you're waiting, you could check out How to Build a 24-Core Linux Cluster in a $29.99 IKEA Cabinet or How to Identify Bacteria on Your Hands Using DNA Sequencing. Once the cloning is complete you can do a test and boot from the newly created bootable image on the external hard drive by restarting your MacBook and holding the option key. This will let you choose which disk you'd like to boot from. You should be able to boot from the external hard drive at this point and it will look like you booted from the internal hard drive that you just cloned.
Step 5: Swap the external hard drive with the internal hard drive. Apple made it very easy to replace hard drives on the MacBook. By the way, for this step, unplug the power from your laptop and shut the computer down. For a complete guide how to do this, you can download Apple's Hard Drive Replacement Instructions. First, remove the battery on the bottom of the laptop using a coin to unlock it. With the laptop flipped upside down and the battery removed, unscrew three little screws using a small Phillips head screw driver that hold a retaining clip. You don't have to fully remove the screws from the retaining clip to remove it. Once the retaining clip is removed, fish out the white plastic flap and pull to slide out the internal hard drive.


With the old hard drive out, remove the metal sheath from it by taking out the four screws. The screws require a star-tipped screwdriver. Because I didn't have that, I just used a pliers to grab onto the screw heads and twist them out. With the old hard drive now completely out, take the new one and in reverse order of taking the old one out, put the new one in.

Step 6: Turn on your MacBook and enjoy your extra space. After you reassembled your MacBook, you should just be able to turn it on like normal and it will boot up from the newly-installed 500GB hard drive. Everything will look and behave just like before except now you'll have tons of extra space! You can right click on the hard drive in Finder and choose "Get Info" and rename the hard drive to something like "MacBook HD" if you like.
Step 7: Put the external HD case to good use. Either put the old hard drive into the external HD case and use it for a file backup or get an additional 250GB HD for the case and regularly use SuperDuper! to clone the internal 250GB HD onto the external one. That way if your internal HD ever dies, you have a clone ready to swap into your MacBook in about 5 minutes and continue with your work right where you left off!
Piece of cake!!
27 comments:
Your instructions are great. Thanks for posting. I also appreciate you posting what you learned; I used the first post you did to upgrade my system to 500 GB having seen your warning, so I realize I might be in for some trouble of my own doing.
You mentioned you weren't able to tell what machines could handle the bigger harddrives and which ones could not. Did you run into any data problems yourself, and how did you discover them? IE, where there any specific symptoms? Also, would you mind sharing when you bought your MacBook. I bought mine in April 2007, so I'm guessing it could be affected. Thanks!
ryan, Thanks for leaving your comment. I bought my MacBook in October 2007. A while back I had a problem with my MacBook, but I'm not 100% sure what the problem was. I had a 500GB HD installed (with around 250GB of data on it) and while watching a DVD, my computer crashed. It was having some problems booting up after that. After getting it booted up, I then deleted a few gigs of data, to possibly avoid the mysterious "250GB limit" and my computer was fine again. After this happened, and hearing similar stories from others, and thinking about the first call I made to Apple a long time ago about upgrading the HD (they said they only offered up to a 250GB upgrade, but also said I could bring in a 500GB HD and ask tech service to install it for me), I felt it would be wise to downgrade to a 250GB to be on the safe side.
Great instructions. I used your 500 GB guide a few months back and haven't had any major problems, except the laptop runs a little bit hotter than before.
I wanted to use the guide to upgrade another laptop with a 1 TB drive and then saw your warning. Any idea if the 250 GB "limit" is for the entire drive? What if I partitioned the hard drive into smaller (< 250 GB) chunks? Thanks!
damngood, that's a good question! I wish I knew the answer. :) I would guess that the "limit" was bound to the individual partition size as you're suggesting, but that's just a guess.
I have been using a 500gb drive in my June 2007 Macbook 2,1 now for over half a year and haven't had any problems so far.
However I have partitioned the HD such that Mac OS X uses only 430 of the 500 Gb. Currently about 280GB are occupied and everything works just fine (HD temp: 34°C).
Anyway I guess making two 250GB partitions isn't a bad idea. You could use one of them for your data and the other one for your system just as Linux users do.
Please accept these box of virtual chocolate. My Upgrade worked like a dream.
Quick Note: Make sure you have a phillips star screwdriver as you would need it for the hard drive. I did not have one and tried using pliers, worked but im pretty sure I damaged my ex hard drive.
Say hello to my Black Macbook with 250 GB worth of memory.
Thanks again
I read your original post when searching for upgrading my MacBook hard drive. A friend had recommended googling for instructions and she had upgraded to 500 GB. (I don't know the age or capabilities of her MB.) I was so excepted to put 500 GB in here. But I found my tech specs that say 250 GB (early 08)and then read this update post. So I guess I will go for 250 at 5400 speed (I had been wondering if I could put 500 GB - or more - and 7200 in, but best not push my luck, and just do as Apple tells me, huh?)
Thanks for your detailed instructions. Looking forward to not having to constantly wrestle over downloading items and what I need to get rid of before I can add something etc. I never thought my 120 GB hd would fill so fast. (Which is why I'm not happy about "only" 250 upgrade.)
Hey Tim, is it worth getting an enclosure that has firewire and usb for about $5 or so more. When I got my new MacBook I used firewire to transfer everything over from my old MacBook. Can I do the same with Super Duper!? Or to use firewire would I need to install OS first then use Time Machine backup drive or something else. IOW, does cloning with Super Duper only work through USB? Would love to here your thoughts.
Lisa, I think that's a great idea. Especially for just $5 more, it would definitely be worth it. I don't see any reason why that wouldn't work out. You should be able to folow the instructions exactly but just swap in the Filerwire instead of USB. But having said that, since I haven't done it myself, I can't say for sure it will work. :)
Let me know if it works out and thanks for stopping by!
Hey Tim, Yes it worked!
I finally got around to getting my upgrade done. I got the firewire enclosure, and the cloning went off without a hitch. Thanks to your instructions and the confidence it gave me, everything did. I upgraded to 4 GB RAM while I was in there also.
Thanks again. I'm enjoying my "new" lightning fat Mac, with double the hard drive and quadruple the RAM.
Nice clear instructions. I heartily second the Super Duper recommendation.
Just a data point: White MacBook 3,1, late '08, 2.2 GHz. Replaced stock drive with a 320GB, 7200 rpm Western Digital Scorpio Black WD3200BEKT. Partitioned as ~120 GB boot and ~180 GB data. No increased noise or vibration over stock Hitachi 120 GB, 5400 rpm drive. Although I didn't compare the MacBook temperatures before/after the swap, I didn't notice anything untoward on iStat in the menu bar. After 17 months, no problems.
c.d.
Tim, or anyone, do you know if the WD 250GB My Passport HD will work for this?
http://www.bestbuy.com/site/Western+Digital+-+My+Passport+Essential+250GB+External+USB+2.0+Portable+Hard+Drive+-+Black/9522251.p?id=1218118265547&skuId=9522251&st=western%20digital&cp=1&lp=6
I just purchased this but am unsure if I will be able to disconnect the SATA from the USB on the inside. Can someone help?
Lisa, That's great that you managed to do this with the Firewire interface. i wish I would have thought of that. Thanks for leaving feedback!
c.d., Thanks for the data point.
Brenna, I'm not sure if it's possible to disconnect the SATA to USB interface from the HD on that model. Tough to say without seeing it.
Thanks so much for this great post! Just finished upgrading to 320 GB (pushing the limit a little past the recommended 250 GB. if I get too much heat, I'll try partitioning).
Now to figure out why my RAM isn't working...
But I'm thrilled to have more storage capacity. Great way to extend the life of my macbook. It's economical and green. Woohoo!
Ok, little confused.
I upgraded my Santa Rosa MacBook3,1 to a 320 GB over a year ago. Everything's been fine. No extra heating, drive noise, etc.
Now I have just upgraded to a 620 GB, and it also appears to be fine. My question/comment then has to do with whether ANYONE has actually reported any problems with >250 GB drives in MacBooks, and which models, specifically? There seem to be several counter examples on the web where everything just worked fine (including myself... I went up to 315 GB of data which is why I'm upgrading).
Warning everyone off of this kind of upgrade is kind of paranoid, isn't it?
Cooperton, Yes, you could see it as being paranoid, I agree, because many people including you have left feedback reporting that no problems have occurred whatsoever. However, while in the minority, some people have left comments saying that they did have problems. Add to that a tech person at Apple directly told me that the specific Macbook model I had could only handle up to a 250GB hard drive, I felt I must say something about there possibly being a limit. I couldn't sleep at night thinking I was helping people upgrade their Macbooks only to have them fail down the road. I'm glad that for the majority of people it's working out fine.
Great instructions. Followed it, but I also zero'ed the new hard drive. And it automatically did the GUID partition as well.
The only difference I have noticed with the new hard drive installed is the boot time. When i turn on my macbook, it is blank white for about 8 seconds, then the apple logo shows and loads for another 10-15 seconds. Before with the OG hard drive, it would go straight to the apple logo when turning it on.
Other than the extended boot time, everything is well and identical.
To those who have found tech specs for their 2007 or 2008 MacBooks that state the 250 GB limit - can you post a URL? The only tech specs I can find on Apple's site state the hard drive configurations that were available at that time, with 250 GB being the largest, but no where does it state this is a max.
cgs, I could never find tech specs that specified that either. Unfortunately what has been told to me (and others who commented here: http://obscuredclarity.blogspot.com/2008/10/500gb-macbook-harddrive-upgrade-for.html) by Apple support employees is not officially documented anywhere that I can find. That's why this issue is unclear and frustrating, to me at least.
Thanks so much for this! I got a message that my start up drive was full and thought I was going to have to buy a whole new Mac. This is a great solution and waaaaay cheaper.
I appreciate your post. I'm going to go purchase a 640GB hard drive tomorrow and give it a go. I'll try to remember to come back and post my results.
As promised, I am back with the status of my upgrade.
It worked like a charm. I have a newer Macbook 13" purchased mid 2010.
The manual (with hard drive replacement instructions can be found at http://manuals.info.apple.com/en_US/MacBook_13inch_Mid2010_UG.pdf
I purchased a WD 640GB 5400rpm drive on sale for $49.99.
I followed your instructions and it worked perfectly. I am writing from my updated computer.
My biggest issue was having screw drivers small enough. I used a steak knife to remove the screws but have since gone to purchase proper screwdrivers before re-assembling.
The hard drive itself has 4 small screws using Torx heads. So I am currently typing with the drive not properly seated in the system (though it is connected to the sata cable).
I'm about to shut down to place all the screws back in place.
Thanks for your excellent instructions. Worked like a charm.
Hi John, Glad it worked out for you. Thanks for sharing your experience. It's amazing how cheap a 640GB drive is these day.
Ura dork
um, thanks.
Hi Tom, I'm not tech-savvy at all, and have been trying my best to find the specific specs for a replacement hard drive for my late 2008 white macbook. From your blog and other websites, I know it's best to stay within 250gb and 5200rpm (even though it's tempting to get ones with better specs since we're almost in year 2014 and the technology has definitely advanced since 2008!). Do you have any updates regarding the recommended max size, since the last post made in 2011? And before I buy it, do you know if this one will be compatible? http://www.amazon.com/gp/product/B00168BSEW/ref=gno_cart_title_1?ie=UTF8&psc=1&smid=ATVPDKIKX0DER
Thanks!
Thanks to your guide, in 2010 I installed a 500GB, albeit with two 250GB partitions as some suggested to get around the supposed "limit". No problems since then.
But does the volume size limit apply also to external drives? You spoke of using a 500GB external, and I'd like to know if you had any issues with it.
Post a Comment