Thursday, November 12, 2009

Hello World Java Web Application in Eclipse (Part 1)

Want to integrate charts into your webapp? Check out XChart.

Java Web Application Structure in Eclipse


Download .war and full source code of this and other sample Java Web Applications here.

This is the first of a three part series of tutorials that shows how to create a Hello World Java Web Application in Eclipse. In this part, I demonstrate how to create your Java Web Application project in Eclipse and set up the directory structure of the project. In Part 2, I take you through getting the Java jar needed to code Java servlets, creating a Java Servlet and a JSP file, configuring the web.xml and build.xml files. In Part 3, I show how to build the project with ANT using the build.xml file and how to deploy the project to a Tomcat server running on your development computer. Along the way, I point out a few tips and tricks for using the Eclipse EE IDE.


Step 1: Install the Eclipse IDE for Java EE developers. Once installed, open up Eclipse and go to the Eclipse Workbench. I also recommend tweaking the default Eclipse development settings for a much cleaner and efficient coding experience.

Step 2: Create a new Java Project. Right-click somewhere in the Package Explorer View and select New--->Project... .


On page 1 of the Project Wizard, choose "Java Project".

On page 2 of the Project Wizard, give the project the name: "HelloWebApp".

Finish the wizard.


Step 3: Set up the directory structure of the web app project. For this I followed the recommendations outlined in the Tomcat documentation that comes with the Tomcat installation, except I chose to include a lib folder directly in the project to hold Java jars needed for the project. Create the nested directory structure as follows:

HelloWebApp (this is the project)
--src
----com.hello (this is actually a package, not a folder)
--lib
--web
----WEB-INF

The src folder holds all your Java source files including any Servlet classes, which you place in the com.hello package. The lib folder holds any 3rd party jars your project depends on. The web folder holds any .jsp or .html pages, Javascript files, and CSS files. The web folder also contains a folder named WEB_INF, which hold the project's web.xml file.

Here's what your new HelloWebApp Java project should now look like in the Eclipse Package Explorer View.


Piece of Cake!!

Download .war and full source code of this and other sample Java Web Applications here.
Hello World Java Web Application in Eclipse (Part 2)
Hello World Java Web Application in Eclipse (Part 3)

Wednesday, November 11, 2009

Setup Eclipse for Efficient Java Coding

The default Java coding settings in Eclipse are fine until you realize one day that there are some really neat things that Eclipse can do automatically for you that aren't activated by default. Here's how I like to set up my Eclipse development environment after a clean install.

Step 1: Make the text editor show line numbers. This helps immensely when reading stack traces and locating errors in your code. Go to the Eclipse Preferences, drill down to "Text Editors" and check the box next to "Show line numbers".


Step 2: Make the Workspace build, refresh, and save automatically. Refreshing forces the folders and files shown in the Package Manager View to be updated when anything changes in those directory behind the scenes. Drill down to "Workspace" and check the boxes.


Step 3: Automate certain tasks whenever you save. Drill down to "Save Actions" and make your selections. Formatting the source code automatically is one of the greatest timesavers. How it's formatted will be defined in Step 3. Under additional actions, my favorite save action is "Remove unused imports". Organizing imports is very time-saving as well. Each time you new-up a new class in a java file, just hit save and the import for that class will be automatically generated.


Step 4: Set up the Code Formatter. This properly indents your code, adds blank lines where you want them, etc., all automatically. Drill down to "Formatter" and make your selections. There are too many choices here for me to go through and I actually use settings very close to the default. The important thing is that the Formatter was activated in step 3. Your changes to the formatter can be saved and shared between developers on a team so that all code is formatted consistently. Use the export button to export an XML file.


Step 5: Setup code templates. For example, when a new class is created, you can have it add certain comments formatted in the way you like. Drill down to "Code Templates" and make your selections.


Step 6: Setup custom editor templates. For example, I often need a log4j logging member in a class, and instead of typing it all from hand or copying and pasting from another class, an editor template can be created to speed up the process. Drill down to "Java" --> "Editor" --> "Templates" and import the following XML pasted into an XML file.


Step 7: See all your changes in effect. Create a test class, add some fields with different indentations, new up an ArrayList, and save. You should see line numbers. You should see the fields automatically align and the import for the ArrayList be added to the imports. Add a method with a parameter that returns a String, type /** above the method definition, and hit enter. You should see a JavaDoc comment automatically be created according to how you defined it in the code templates.


Piece of Cake!!

Installing Eclipse IDE for Java EE Developers on Mac OS X

The Eclipse IDE for Java EE Developers is by far the most popular download in the Eclipse IDE family. Developers use it mainly for developing Java Web Applications, which are made up of primarily JSP, XML, HTML files and Java Servlets. Installing the Eclipse IDE for Java EE Developers can be done in a few simple steps.

Step 1: Go to www.eclipse.org and download the proper version of Eclipse for your operating system. I happen to be developing on a 64-bit Mac running Mac OS X Leopard, so I downloaded the Mac Cocoa 64-bit version.


Step 2: Unzip the downloaded *.tar.gz file (double-click it) and move the "eclipse" folder to the root of your hard drive. Eclipse is installed!

Step 3: In the /eclipse directory, you'll find a Eclipse.app file. Double clicking it will start Eclipse. I prefer to drag this file down to the Dock for easy access.


Step 4: Once Eclipse is started, you'll be greeted by the Eclipse welcome screen.


Step 5: Click on the Workbench icon in the upper right corner to get to the workbench. You'll be asked to choose a workspace. This is where all your Java EE projects will reside.


Piece of Cake!!

Unpack a Java .war file on Mac OX S

Unpacking Java .war file on a Mac is not hard at all. For this demonstration, I'll use the sample.war file that comes with the Tomcat Installation.

Step 1: Fire up the terminal


Step 2: cd to the directory where the .war resides. In this case I moved it from the Tomcat directories to /sample beforehand.

# cd /sample

Step 3: Unpack the .war with the following command:

# jar -xvf sample.war


The contents of the .war are unpacked for you and placed in the same folder as the .war file.


Piece of Cake!!

Sunday, November 8, 2009

Installing and Running Tomcat on Mac OS X

Using MySQL and Java? Check out an easier way: Yank

Installing Tomcat on Mac OS X should be easy, and it is, if you follow these instructions exactly.


Step 1: Get Tomcat. Go to tomcat.apache.org and download the version of Tomcat you need. Download the "Core" distribution with the tar.gz extension and unzip it (double-click the file).

Step 2: Install Tomcat. Move the contents of the unzipped file to /Library/Tomcat, creating the folder "Tomcat" in "Library" if it is not there already. That's it. Tomcat is installed.


Step 3: Fire up the terminal.


Step 4: Start Tomcat.

# sh /Library/Tomcat/bin/startup.sh

Step 5: Test if it worked. Use your browser to go to: http://127.0.0.1:8080/ You should see the default Tomcat homepage running from your newly installed Tomcat server.


Step 6: Shutdown Tomcat:

# sh /Library/Tomcat/bin/shutdown.sh

Optional steps to deploy a sample .war file!

Step 7: Point your browser to: http://127.0.0.1:8080/docs/appdev/sample/

Step 8: Download the sample .war file found on the above page and place it in /Library/Tomcat/webapps. Tomcat will recognize and load the .war file.

Step 9: Point your browser to: http://localhost:8080/sample/ to view the sample webapp.


By the way, Tomcat can be found in the Activity Monitor with the name "java". If Tomcat ever hangs and you need to kill the process, just use Activity Monitor to do so.


Piece of Cake!!


See also: MacBook Hard Drive Upgrade Instructions
And also: Install MySQL on Mac OS X

Sunday, October 25, 2009

Rock Climbing in Bielatal near Dresden, Germany

Rock climbing in Bielatal is like warping back in time and landing in the days when climbers climbed barefoot, wore Swami belts, and used slings for protecting routes - literally.

The climbing in the Dresden, Germany area has not followed the flashy modern ways of most other climbing venues. No chalk, no bolts, no top-roping, no nuts, no cams. While modern climbing harnesses and shoes are now common sights in Bielatal, you might be chased out of the woods if you're seen using the aformentioned items. Part tradition and part protecting the soft sandstone, the modern metal climbing gear found hanging on people's harnesses in every crag in America is not allowed in Beilatal. Watching the locals climbing with just a rack of slings and biners is a humbling experience.

Getting there. You can get to Bielatal using public transportation. View this Google Map.

Several sandstone towers reach above a forested ridge a few kilometers from the Czech Republic.

Most of the routes follow flaring crack systems.

Most routes are lead and the followers are top-belayed to prevent rock-damaging rope drag.

The first follower trailing a rope for the next.

An old-school biner from the DDR!

Slings with knots tied in them for protection.

Heike demonstrates the "fling" technique. Tie the perfect size knot one-handed on lead, and fling it in the crack above your head until it catches.

One of the few "bolts" seen in the rock.


At the top, there is usually a single monster anchor to secure yourself into and to rappel from. Tradition calls for everyone to shake each others hands and say "Berg Heil!" (salute the mountain!).

Each tower has its own register book in specially created metal boxes on the top, which you must sign. It's very important to document who lead the route and who top-roped. And most importantly, use the supplied straight edge to draw a horizontal line under your party's entry.

Kicking back on the top. Berg Heil!

See also: Diedre 5.7, Squamish - Climbing Beta
and: Ten German Birds

Saturday, October 24, 2009

Add an Image to an Eclipse RCP Application

This article shows how to add an image to a view in an Eclipse RCP application and builds off of a clean RCP Application with a View. Images used in an RCP application are managed by an ImageRegistry that is global to the scope of a plugin. If your project has a class that extends AbstractUIPlugin, then there is a static method you can use called getImageDescriptor() to access ImageDescriptors given a path to the image. The Activator class ectending AbstractUIPlugin is automatically generated if you used the wizard to create a Hello World Eclipse RCP Application. The ImageRegistery is the preferred means of handling images in your application because it handles the lazy loading of the images and disposes of them properly when needed. The image is added to a view by adding a canvas to the view's parent composite and adding the image from the image descriptor to the canvas through its addPaintListener method. It may sound confusing, but in practice it's really simple.

Step 0: Create a Hello World Eclipse RCP Application and add a View to it.


Step 1: Add the image into the RCP plugin project. In this example an image called moon.png is added to the "icons" folder inside the plugin project. Whether you use this folder or not is really not important - you can organize your images any way you want. In the next step, the path to the image's location is used to get the image.


Step 2: Add the image to the view. In the view's class where you want the image to appear, add a global Image field and set it in the view's constructor calling the Activator.getImageDescriptor("icons/moon.png").createImage(); method. Adjust the path accordingly to locate your image. The path is relative to the plugin. In the createPartControl method, add a Canvas to the view's parent Composite and define its PaintEvent to draw the image. In the drawImage method, give it the image and the x and y coordinates where it should be drawn.

package com.blogspot.obscuredclarity;

import org.eclipse.swt.SWT;
import org.eclipse.swt.events.PaintEvent;
import org.eclipse.swt.events.PaintListener;
import org.eclipse.swt.graphics.GC;
import org.eclipse.swt.graphics.Image;
import org.eclipse.swt.widgets.Canvas;
import org.eclipse.swt.widgets.Composite;
import org.eclipse.ui.part.ViewPart;

public class MainView extends ViewPart {

public static final String ID = "com.blogspot.obscuredclarity.mainView"; // the ID needs to match the id set in the view's properties

private Image image;

public MainView() {

image = Activator.getImageDescriptor("icons/moon.png").createImage();
}

@Override
public void createPartControl(Composite parent) {

// Create the canvas for drawing
Canvas canvas = new Canvas( parent, SWT.NONE);
canvas.addPaintListener( new PaintListener() {
public void paintControl(PaintEvent e) {
GC gc = e.gc;
gc.drawImage( image,10,10); // Draw the moon
}
});
}


public void setFocus() {}

}


Step 3: Run the application and test if everything worked. Your application should now have an image in the view and look something like this:

Piece of cake!!


<--- Previous - Add a Custom Menu Action to an Eclipse RCP Application
---> Next - Import and Export an Eclipse RCP Application Project
Also see: Eclipse RCP Tutorial Table of Contents

Monday, October 19, 2009

Add a Custom Menu Action to an Eclipse RCP Application

This article shows how to add a custom menu item to a menu in an Eclipse RCP application and builds off of a clean Hello World Eclipse RCP Application. As shown in the article Add a Menu to an Eclipse RCP Application, it is very easy to add a File menu containing the Exit action. Here a custom menu action is added to the File menu that opens a dialog box when clicked.

Step 0: Create a HelloWorld RCP application.

Step 1: Make the custom action. Create a new class that extends org.eclipse.jface.action.Action and implements IWorkbenchAction. The class needs a private static final String property used to set the ID in the constructor. Inside the run() method is where you put your custom code. In this example, code is added that opens up a message dialog box.
package com.blogspot.obscuredclarity.customaction;

import org.eclipse.jface.action.Action;
import org.eclipse.jface.dialogs.MessageDialog;
import org.eclipse.swt.widgets.Shell;
import org.eclipse.ui.PlatformUI;
import org.eclipse.ui.actions.ActionFactory.IWorkbenchAction;

public class CustomAction extends Action implements IWorkbenchAction{

private static final String ID = "com.timmolter.helloWorld.CustomAction";

public CustomAction(){
setId(ID);
}

public void run() {

Shell shell = PlatformUI.getWorkbench().getActiveWorkbenchWindow().getShell();
String dialogBoxTitle = "Message";
String message = "You clicked the custom action from the menu!";
MessageDialog.openInformation(shell, dialogBoxTitle, message);
}

public void dispose() {}

}


Step 2: In the ApplicationActionBarAdvisor class add the CustomAction as a private field. In the makeActions() method, new up the custom action, set its text and accelerator and register it. The accelerator is of course optional and it simply adds a keyboard shortcut, in this case CTRL+T. In the fillMenuBar() method, add the action to a File Menu.
package com.blogspot.obscuredclarity;

import org.eclipse.jface.action.IMenuManager;
import org.eclipse.jface.action.MenuManager;
import org.eclipse.swt.SWT;
import org.eclipse.ui.IWorkbenchWindow;
import org.eclipse.ui.application.ActionBarAdvisor;
import org.eclipse.ui.application.IActionBarConfigurer;

public class ApplicationActionBarAdvisor extends ActionBarAdvisor {

private CustomAction customAction;

public ApplicationActionBarAdvisor(IActionBarConfigurer configurer) {
super(configurer);
}

protected void makeActions(IWorkbenchWindow window) {

//Custom action
customAction = new CustomAction();
customAction.setText("Do custom action!");
customAction.setAccelerator(SWT.CTRL + 'T');
register(customAction);
}

protected void fillMenuBar(IMenuManager menuBar) {

MenuManager fileMenu = new MenuManager("&File", "file"); //create a menuManager to take care of all submenus in "File"
fileMenu.add(customAction); //Add the "customAction" action
menuBar.add(fileMenu); //Add the "File" menu to the menuBar
}

}


Step 3: Run the application and test if everything worked. Your application should now have a File Menu containing a custom action:


When the custom action is clicked or CTRL+T is entered, a messaage box should come up:
Piece of cake!


<--- Previous - Add Nested Menu Items to an Eclipse RCP Application
Next ---> - Add an Image to an Eclipse RCP Application
Also see: Eclipse RCP Tutorial Table of Contents

Sunday, October 18, 2009

MacBook Hard Drive Upgrade Instructions

This article shows how to upgrade the hard drive in a Macbook while keeping all existing files, software, settings, and preferences intact.
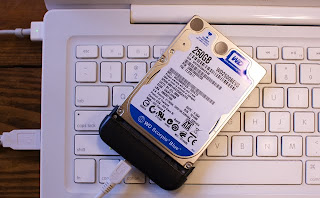


First, a note about MacBooks and hard drive capacity. The info out there in the interwebs regarding the maximum HD capacity a MacBook can be upgraded to in unclear. In my experience, upgrading above 250GB is ill-advised, however many people have left comments that they've had no problems at all. In a previous article I wrote, 500GB MacBook Harddrive Upgrade for Under $100, the issue came up from some commentors that the hard drive controllers in certain MacBook motherboards couldn't handle HDs with more than 250GB capacity. The upgrade and subsequent use will work, but when the HD starts to fill up to the ~250GB level, problems and perhaps data corruption/loss will occur. I was able to verify this with Apple, that for my MacBook, greater then 250GB wouldn't be a good idea, but for other newer models it is OK. How to tell which models can be upgraded to what, I couldn't find out. After learning this, I chose to downgrade the 500GB HD in my MacBook which I installed previously and use that as an external data backup device.

Disclaimer: Before you attempt this, backup all your data! Perform this upgrade at your own risk. This worked for me, but I can't guarantee it will work for you! Consider any warranty issues this might cause and call Apple first to see if this will void your warranty and/or AppleCare Protection Plan. Take Electrostatic Discharge (ESD) precautions when handling the hard drive out of it's case or handling any raw circuitry with with your hands. It's never a good idea to directly touch electrical components on a Printed Circuit Board (PCB), but having said that, if you are properly grounded no damage will occur. All you need to do is touch something connected to the ground with your finger to neutralize any static charge your body may be holding before you touch the electronics. If you're not sure of what you're doing, proceed with caution (but do proceed so you learn something new)! I performed this upgrade on my all-white MacBook I bought in October 2007, which is running Mac OSX 10.5.5.

Step 1: Buy a 150GB internal laptop hard drive and an external hard drive enclosure. What's important is the HD needs to have a 2.5 inch form factor and a SATA 2 interface. The enclosure must be the USB/SATA type. The exact hard drive and hard drive enclosure I used were:
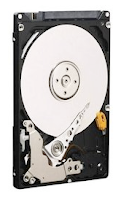
Link: Western Digital Scorpio

Link: StarTech InfoSafe


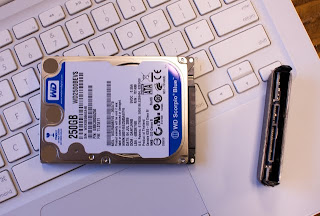
Step 2: Connect the hard drive to a free USB port using the USB to SATA connector that is part of the external HD enclosure. Simply connect the HD to the USB/SATA connector and plug the connector into your computer using a USB cable.


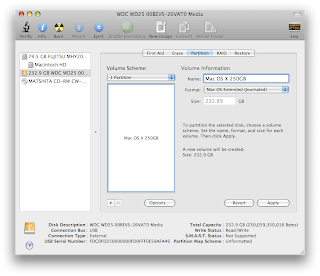
Step 3: Partition the external drive as a GUID Partition Table drive. The drive must be partitioned this way if you ever want to upgrade the OS in the future for an Intel-based Mac. Open Disk Utility and select the external hard drive in the left column. Select the "Partition" tab. Select "1 Partition" as the Volume Scheme. You can give the volume a name now if you like, but you can always change it later. Choose "Mac OS Extended (Journaled)" as the Format. Click on the "Options..." button and choose the "GUID Partition Table". Click "OK" and then "Apply".
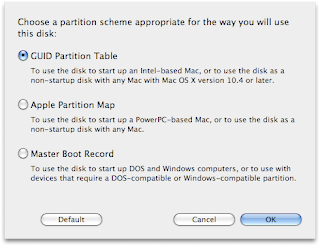


Step 4: Use SuperDuper! to clone your current bootable harddrive image to the external drive. This free software will quickly and easily make an exact copy of your current OS image including all your software, existing files, settings, and preferences - it only takes a few clicks.
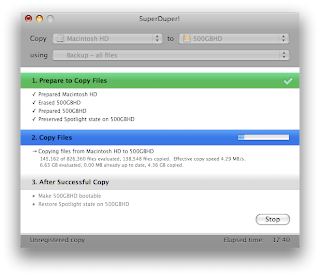


With the external harddrive plugged in the USB port, run SuperDuper! Select: Copy "Macintosh HD" to "250GB HD" (or whatever it's named in your case) using "Backup - all files" and click the "Copy Now" button. After an hour or so depending on how much data you have, the external hard drive will be an exact copy of the hard drive inside your MacBook. While you're waiting, you could check out How to Build a 24-Core Linux Cluster in a $29.99 IKEA Cabinet or How to Identify Bacteria on Your Hands Using DNA Sequencing. Once the cloning is complete you can do a test and boot from the newly created bootable image on the external hard drive by restarting your MacBook and holding the option key. This will let you choose which disk you'd like to boot from. You should be able to boot from the external hard drive at this point and it will look like you booted from the internal hard drive that you just cloned.

Step 5: Swap the external hard drive with the internal hard drive. Apple made it very easy to replace hard drives on the MacBook. By the way, for this step, unplug the power from your laptop and shut the computer down. For a complete guide how to do this, you can download Apple's Hard Drive Replacement Instructions. First, remove the battery on the bottom of the laptop using a coin to unlock it. With the laptop flipped upside down and the battery removed, unscrew three little screws using a small Phillips head screw driver that hold a retaining clip. You don't have to fully remove the screws from the retaining clip to remove it. Once the retaining clip is removed, fish out the white plastic flap and pull to slide out the internal hard drive.
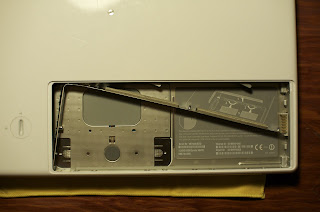
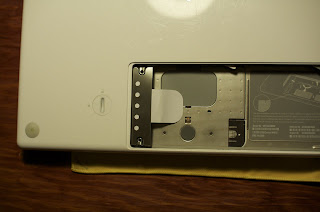


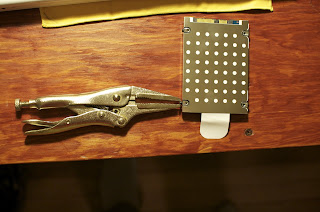
With the old hard drive out, remove the metal sheath from it by taking out the four screws. The screws require a star-tipped screwdriver. Because I didn't have that, I just used a pliers to grab onto the screw heads and twist them out. With the old hard drive now completely out, take the new one and in reverse order of taking the old one out, put the new one in.


Step 6: Turn on your MacBook and enjoy your extra space. After you reassembled your MacBook, you should just be able to turn it on like normal and it will boot up from the newly-installed 500GB hard drive. Everything will look and behave just like before except now you'll have tons of extra space! You can right click on the hard drive in Finder and choose "Get Info" and rename the hard drive to something like "MacBook HD" if you like.

Step 7: Put the external HD case to good use. Either put the old hard drive into the external HD case and use it for a file backup or get an additional 250GB HD for the case and regularly use SuperDuper! to clone the internal 250GB HD onto the external one. That way if your internal HD ever dies, you have a clone ready to swap into your MacBook in about 5 minutes and continue with your work right where you left off!

Piece of cake!!