 Because of the following two warnings, I created a new article containing easier upgrade instructions and addressing the issue of the 250GB limitation in some MacBooks: MacBook Hard Drive Upgrade Instructions
Warning #2! (Also see warning #1 directly below.) On July 30, 2009, cjewelz left a comment below saying that he called Apple AS centre about the maximum size they would recommend upgrading to and they said 320 GB. According to cjewelz they said upgrading to 500GB would cause overheating. My MacBook has not had any overheating issues with a 500GB HD. However, I contacted Apple, and what they told me is that my MacBook can be upgraded to a maximum of only 250GB because the HD controller on the motherboard can only handle up to a 250 GB hard drive. I guess this means that when my 500GB HD fills up to ~250GB, weird stuff will occur and my HD will possibly be corrupted and un-useable. I remember calling Apple around the time that I did the upgrade asking about upgrade options and they told me that they could only upgrade to 250GB, but if I brought in a 500GB HD, they would install it for me (for some cost). Hmmm... Mixed messages... So it seems like a 250GB or less upgrade is OK, a 320GB may be not OK, and 500GB is bad. I haven't yet found any website which lists MacBook hard drive size limits according to the different MacBook models. If I get a more concrete understanding of the HD size limitations, I'll post the information so others have it and link to it from here. Proceed with caution.
Warning#1 As of February 25th, 2009, two readers have left comments regarding the Western Digital 500GB Passport Essential external harddrive featured in this article. Apparently the design of the HD has been changed, and you can no longer disconnect the SATA to USB connector from the main harddrive because it is manufactured as one piece. One reader reports a one-piece HD bought in the UK and dated January 2009. If you end up with one of the one-piece HDs, you won't be able to successfully complete the upgrade as described in this article.
However, most of this article is still relevant as reader Zack pointed out. Here is his comment: "Even though the Passports are not compatible anymore this upgrade is still easy and very affordable. I opted to get a drive and enclosure separately rather than the passport and spent $107.68. The quality of the enclosure may not be as good as the Passport enclosure but it's still really small and nice enough. I still recommend and encourage this upgrade and just told someone else about it today."
Following is a hard drive and an enclosure that would work for the upgrade. What's important is the HD needs to have a 2.5 inch form factor and a SATA 2 interface. The enclosure must be the USB/SATA type.
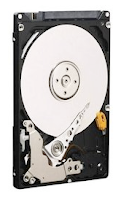 Link: Western Digital Scorpio
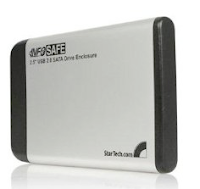 Link: StarTech InfoSafe
Start of original article:
The 80GB harddrive that came with my white MacBook I bought a over a year ago (October, 2007) has become the limiting factor of my computing productivity. For example, if I want to tap into my entire mp3 collection through iTunes and have all my pictures in iPhoto while I use the computer, I'm well over 80 GB and am forced to use an external harddrive. With only two USB ports on a MacBook and one of them taken up by an external harddrive, I'm constantly swapping peripheral device USB cables in the remaining port. I love everything else about my MacBook and wouldn't want to upgrade my entire computer yet, and a 500GB harddrive would extend my use of it for at least two more years. Faced with this challenge, I set out to do the upgrade myself and avoid the offensive fees Apple would charge for the upgrade to a maximal measly 250GB.
In a nutshell, to upgrade to a 500GB harddrive on your MacBook while keeping all your existing files, software, settings, and preferences intact for less than $100, follow these simple steps:
- Buy a 500GB external harddrive for ~$150 or less.
- Partition the external drive as a GUID Partition Table drive
- Use SuperDuper! to clone your current bootable harddrive image to the external drive
- Disassemble the external hardrive enclosure
- Swap the external harddrive with the internal harddrive
- Turn on your MacBook and enjoy your extra space
- Repackage the old harddrive into the external harddrive enclosure
- Sell your 80GB external harddrive on Craigslist or eBay for ~$50
Warning: Before you attempt this, backup all your data! Perform this upgrade at your own risk. This worked for me, but I can't guarantee it will work for you! Consider any warranty issues this might cause and call Apple first to see if this will void your warranty and/or AppleCare Protection Plan. Take Electrostatic Discharge (ESD) precautions when handling the harddrive out of it's case or handling any raw circuitry with with your hands. It's never a good idea to directly touch electrical components on a Printed Circuit Board (PCB), but having said that, if you are properly grounded no damage will occur. All you need to do is touch something connected to the ground with your finger to neutralize any static charge your body may be holding before you touch the electronics. If you're not sure of what you're doing, proceed with caution (but do proceed so you learn something new)! I performed this upgrade on my all-white MacBook I bought in October 2007, which is running Mac OSX 10.5.5.
Step 1 - Buy a ~$150 2.5 inch form-factor 500GB external harddrive. The key is to buy one that has a SATA interface, which the vast majority do these days. You can find a good deal on a 500GB harddrive online from a reputable dealer such as Amazon.com. I ended up getting a Western Digital My Passport Essential because the price was right and I figured I could disassemble the enclosure pretty easily. With enough patience and searching, you can find this harddrive for under $150 on websites with special promotions. Update: as of Jan. 26, 2009, 500GB Western Digital My Passport Essential HDs cost only ~$115 on Amazon.com.
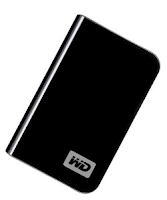 Link: Western Digital My Passport
Step 2 - Partition the external drive as a GUID Partition Table drive. Eric left a comment down below that pointed out you need to have the drive partitioned this way if you ever want to upgrade the OS in the future for an Intel-based Mac. Thanks, Eric! Plug in your new external harddrive to a free USB port. Open Disk Utility and select the external harddrive in the left column. Select the "Partition" tab. Select "1 Partition" as the Volume Scheme. You can give the volume a name now if you like, but you can always change it later. Choose "Mac OS Extended (Journaled)" as the Format. Click on the "Options..." button and choose the "GUID Partition Table". Click "OK" and then "Apply".


Step 3 - Use SuperDuper! to clone your current bootable harddrive image to the external drive. This free software will quickly and easily make an exact copy of your current OS image including all your software, existing files, settings, and preferences - it only takes a few clicks.
 With the external harddrive plugged in the USB port, run SuperDuper! Select: Copy "Macintosh HD" to "500GBHD" (or whatever it's named in your case) using "Backup - all files" and click the "Copy Now" button. After an hour or so depending on how much data you have, the external harddrive will be an exact copy of the harddrive inside your MacBook. While you're waiting, you could check out How to Build a 24-Core Linux Cluster in a $29.99 IKEA Cabinet or How to Identify Bacteria on Your Hands Using DNA Sequencing. Once the cloning is complete you can do a test and boot from the newly created bootable image on the external harddrive by restarting your MacBook and holding the option key. This will let you choose which disk you'd like to boot from. You should be able to boot from the external harddrive at this point and it will look like you booted from the internal harddrive that you just cloned.
Step 4 - Disassemble the external hardrive enclosure. The construction of harddrives will vary, but whether it's held together by screws or just snapped together, you can probably get it apart one way or another. For the Western Digital My Passport Essential, you need to insert your fingernail or a knife between the top an bottom faces and the long side and pop the pieces apart a bit.


You need to loosen all the snaps all along the long edge, BUT NOT on the shorter edges. After the long edge is loose, gently slide the inner part out of the enclosure. I found it a bit difficult to get the sliding started so I helped it along with by twisting the tip of a flat head screw driver between the inner part and the edge of the cover. As with most things in life, having patience and not forcing things is the key to achieving your goal.


Next, carefully remove the plastic piece encircling the harddrive noting how all the pieces fit together so you'll be able to reconstruct everything with the old harddrive later. Slide the harddrive out of the metal sheath and very very carefully detach the USB connector from the SATA power and data terminals on the harddrive. You might want to use a thin blade and pry apart the connection right where they mate rather than torqueing on the USB PCB with your fingers.


Step 5 - Swap the external harddrive with the internal harddrive. Apple made it very easy to replace harddrives on the MacBook. By the way, for this step, unplug the power from your laptop and shut the computer down. For a complete guide how to do this, you can download Apple's Hard Drive Replacement Instructions. First, remove the battery on the bottom of the laptop using a coin to unlock it. With the laptop flipped upside down and the battery removed, unscrew three little screws using a small Phillips head screw driver that hold a retaining clip. You don't have to fully remove the screws from the retaining clip to remove it. Once the retaining clip is removed, fish out the white plastic flap and pull to slide out the old harddrive.


With the old harddrive out, remove the metal sheath from it by taking out the four screws. The screws are kinda funky because they require a star-tipped screwdriver. I just used a pliers to grab onto the screw heads and twist them out. With the old harddrive now completely out, take the new one and in reverse order of taking the old one out, put the new one in.
 Step 6 - Turn on your MacBook and enjoy your extra space. After you reassembled your MacBook, you should just be able to turn it on like normal and it will boot up from the newly-installed 500GB harddrive. Everything will look and behave just like before except now you'll have tons of extra space! You can right click on the harddrive in Finder and choose "Get Info" and rename the harddrive to something like "MacBook HD" if you like.
Step 7 - Repackage the old harddrive into the external harddrive enclosure. In reverse of how you disassembled the 500GB harddrive, reassemble the external harddrive package with the old 80GB harddrive being careful to gently put everything in place and slide it all together.
Step 8 - Sell your 80GB external harddrive on Craigslist or eBay for ~$50. Not only will you recoup some of the cost of the 500GB harddrive, but you'll be recycling by selling your perfectly good external harddrive to someone else who needs one. I would recommend using the Disk Utility and securely erase all the data on it though before selling it.
Piece of cake!
209 comments:
«Oldest ‹Older 201 – 209 of 209Hi Guys
I read this thread before updating my old macbook 3,1 (Santa Rosa) that used to have a 120GB HD, i have upgraded my Macbook with a 640 GB Seagate HD (internal 2.5" Momentus 5400 rpm) and 2 sets of 2GB Kingston RAM modules (667 MHZ), as of now, this baby runs like a charm, no overheating and improved performance (i used to have a lot of overheating and noise with the old HD and 2.5 GB RAM) maybe because i had "unpaired RAM memory" "CPU used to get up to 185 deg F and now it stays around 135 deg F" - 50 Deg F Difference !!!!
If you are looking for an upgrade, i would recommend it !! it is worth since Apple uses really cheap RAM memory and HD (i was so disappointed when i found that out)
Cheers !!
Omar
nice info..
thanks
hi guys
i have a white macbook 2.4ghz intel core 2 duo , 2gb ram . i needed more hdd space so i decided to purchase a 500gb hitachi k500B , i used superduper to clone my original 160gb hdd , the operation went perfectly then i put the new 500gb i the mac and BOOOM ... a lot of issues , actually 2 : non stop fan working and a lot of heat , the major problem was the annoying CONTINUOUS fan noise , the solution is PARTITIONING THE 500GB INTO 2 USING DISK UTILITY before doing the cloning process and the result is NO CONTINUOUS FAN NOISE AT ALL WBUT THE MAC GETS HOTTER IN THE area below the magsafe plug >>>> not a problem for me
so i confirm that partitioning the 500gb hdd into is AN ABSOLUTE RECOMMENDATION
i forgot to mention that the hitachi 5K500 B IS a 5200RPM hdd
Thanks for all the success stories for the 500G 7200rpm drive upgrade. I was gonna do this awhile back, when the collective reasoning on the board had 250G 5400rpm as the most viable option. After letting some time pass and seeing some 500G 7200rpm upgrades w/o problems, I settled on a Seagate 500G 7200rpm drive. Everything worked even better than I'd hoped. No problems so far. Thanks!
Ronnie
Thanks for this tutorial Tim. I just upgraded my White Macbook 2,1 with a brand new 500GB WD Scorpio Black. So far so good, no issues. I also upgraded memory from 1GB to 4GB. For $140 bucks on newegg I got the HDD, Memory and a HDD enclosure.
I had one question if anybody has any thoughts. When I used super duper to copy my files to the new HDD it only copied 92.something of the 95 GB that was there. What does not get copied and should I be worried that anything is missing? Before I wipe the 120GB HDD that was in my laptop I want to know that there is nothing missing. It looks like everything is there but with so much stuff its hard to be sure. Why doesnt it copy gig for gig whats on the old drive?
Thanks,
Robert
@Robert My guess is that all the data was properly transferred. The difference is probably in the way the total size was calculated. A kilobyte has a dual definition. It can be 1000 bytes or 1024 bytes.
http://en.wikipedia.org/wiki/Kilobyte
Manufacturers conveniently use the 1000 bytes definition to make their hard drives appear bigger than they actually are.
So depending on how the numbers you're looking at are calculated, that may be the reason for the difference you're seeing.
I stripped the HDD out of a Seagate Expansion drive and the power pins seem to be offset about 4mm to the left.
Are there different standards for this?
Must I get a specfic model of HDD for the Macbook?
@Peter, that's very strange. I thought all SATA drives have the exact same connection, and I've never heard of a deviation from the standard.
Post a Comment